Have you ever spent hours setting up your perfect podcast or stream, only to realize your microphone makes you sound like you’re broadcasting from a tin can? I remember my first few attempts—struggling with muffled audio, background noise, and a constant feeling that I was just not reaching my audience the way I wanted to. That lightbulb moment hit hard: it’s not just about talking into a mic; it’s about choosing the right one.
Why Getting the Right Microphone Matters More Than Ever
In 2024, the quality of your microphone can make or break your ability to connect with your listeners or viewers. With more creators competing for attention, standing out means delivering crystal-clear sound. According to a recent report from Creator Setup Guide, a significant percentage of audiences will stop listening if audio quality drops even once. That’s why investing in a good microphone isn’t just a luxury—it’s a necessity.
But here’s the thing: with so many options out there, it’s easy to get overwhelmed. I’ll admit, early on I made the mistake of choosing a budget mic that looked cool but sounded terrible—thinking I could fix everything with post-editing. Spoiler alert: no amount of editing can fix poor audio quality in real-time. That’s why I want to help you avoid my rookie mistake and navigate the best options for your needs.
Is All the Hype About Microphones Worth It?
It’s a fair question. Microphone technology has advanced rapidly, and some claims can seem exaggerated. I’ve been there—thinking that a fancy condenser mic would automatically make me sound professional. Turns out, not all mics are created equal, and some are better suited for streaming than others. I learned this the hard way, when I bought a high-end model that was completely incompatible with my setup. You can read more about how to choose the right type in this comprehensive guide.
If you’re tired of feeling frustrated by your audio, stay tuned. I’ll walk you through the top choices for 2024, so you can make an informed decision and finally get the sound quality your content deserves. Whether you’re a beginner or a seasoned pro, the right mic can elevate your game—so let’s dive into what you need to know to choose wisely.
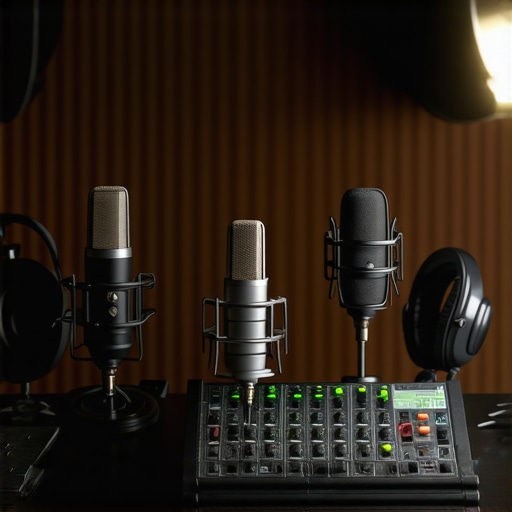
Choose the Right Microphone Type
Start by narrowing down your options between USB and XLR microphones. I once bought a USB mic without much thought, thinking it would be enough, only to realize later that XLR mics offer more flexibility and higher sound quality for professional setups. For beginners, USB microphones like the Blue Yeti or Audio-Technica AT2020USB+ are excellent starting points. If you’re serious about quality and want room to expand, consider an XLR setup, which requires an audio interface but offers superior sound clarity. Check out the ultimate guide to top microphone types for a detailed comparison.
Assess Your Environment and Needs
Before selecting a mic, evaluate your recording space. Do you record in a noisy room or a quiet studio? For noisy environments, dynamic microphones like the Shure SM7B excel at rejecting background noise. For a treated room with minimal echo, condenser microphones such as the Rode NT1-A or Audio-Technica AE2500 can capture more detail. Remember, a good mic paired with proper room treatment can drastically improve your audio. I once tried recording in a busy coffee shop with a condenser mic, and the results were unusable—lesson learned. Use this microphone comparison guide to find the best match for your environment.
Prioritize Sound Quality and Features
Look for microphones with features that suit your recording style. A cardioid polar pattern is ideal for solo streaming or podcasting because it focuses on your voice and minimizes room noise. For multi-person podcasts, consider omnidirectional mics. Additionally, check for features like built-in shock mounts or pop filters, which can save you setup time and improve sound quality. I personally found that adding a dedicated pop filter made a huge difference in reducing plosive sounds, making my voice clearer. For top recommendations, explore the best podcast microphones in 2024.
Set Up for Optimal Sound
Proper setup is as important as choosing the right mic. Place your microphone about 6-8 inches from your mouth, slightly off-axis to avoid breath noises. Use a boom arm or mic stand to position it comfortably and prevent handling noise. If using a condenser mic, ensure it’s connected to a quality audio interface and configured with the appropriate gain levels—too high, and you risk distortion; too low, and your audio will be weak. I once spent hours troubleshooting why my audio was distorted until I realized I had set the gain too high on my interface. Check out the detailed setup tips in the professional setup guide.
Test and Fine-Tune Your Audio
Once your equipment is in place, record some test audio and listen critically. Adjust the microphone position, gain, and room acoustics as needed. Using headphones during recording helps catch issues immediately. I recommend periodically recording short segments and analyzing them to identify background noise or plosives. With some minor adjustments, I achieved a noticeable improvement in clarity. For advanced tips, see the streaming microphone guide.
While choosing the right microphone is crucial, many creators fall into common misconceptions that can undermine their audio quality more than they realize. Let’s dig into some of these hidden pitfalls and how to avoid them.
Why Higher Price Doesn’t Always Mean Better Sound
One of the biggest myths I encountered early on was the idea that a more expensive microphone automatically guarantees professional-quality audio. This isn’t necessarily true. Microphones are designed with specific use cases in mind, and a high-end studio condenser might not be the best choice for streaming or podcasting. For example, the top microphone types reveal that some mid-range mics outperform pricier models in certain environments. It’s about matching your needs and environment rather than chasing the most expensive gear.
Moreover, a costly microphone paired with poor setup or inadequate room treatment can yield subpar results. Remember, your environment and how you set up your mic are just as critical as the mic’s price tag.
Beware of Over-Processing Your Audio
Many creators think that editing can fix bad recordings. While post-processing tools are powerful, they can’t completely salvage recordings with fundamental flaws. Over-reliance on editing to mask poor mic choice or setup can lead to unnatural sound, increased editing time, and listener fatigue. It’s better to get your baseline right—proper mic placement, good environment, and correct gain settings—then use editing for minor enhancements. Check out the best podcast microphones to ensure your foundation is solid.
Choosing the Wrong Polar Pattern for Your Setup
Advanced users often overlook the importance of polar patterns. For instance, a cardioid pattern is excellent for solo streaming because it minimizes room noise, but omnidirectional mics pick up sound from all directions, which can be problematic in untreated rooms. If you’re recording in a noisy environment, selecting a mic with a cardioid or hypercardioid pattern can drastically improve clarity. Conversely, for multi-person setups, an omnidirectional mic might be more suitable. Understanding these nuances can make the difference between clear voice capture and background chaos. See the microphone types guide for more details.
Have you ever fallen into this trap? Let me know in the comments.
Maintaining your microphone setup over time is crucial for consistent, high-quality recordings. Just like any piece of tech, your audio equipment benefits from regular check-ups and minor tweaks to keep it performing at its best. I’ve found that a few dedicated tools and habits can make a world of difference in extending the lifespan of your gear and ensuring your sound remains clear and professional.
How do I keep my microphone setup working smoothly over time?
First, invest in a good cleaning kit designed specifically for microphones and audio interfaces. I personally use a microfiber cloth and a gentle, electronics-safe cleaner to wipe down my mics and stands weekly. Dust and grime can accumulate in the grille or on the body, which can affect sound quality and even cause damage in the long run. Avoid using harsh chemicals; a soft cloth and mild cleaner are enough to keep your gear looking and functioning like new.
Next, regularly check your cables and connectors. Faulty or loose connections are often the culprit behind intermittent audio issues. I recommend keeping a set of spare XLR and USB cables and swapping them out periodically to identify potential faults early. For XLR setups, I use cable testers like the best cable testers to ensure signal integrity.
Keeping your software and firmware up to date is equally important. Many microphones and audio interfaces now come with firmware that can be updated to improve compatibility and performance. I make it a habit to check the manufacturer’s website every few months. This proactive approach prevents bugs and enhances features, making your setup more reliable.
Another key aspect is environment maintenance. Dust and humidity can impact your gear’s longevity. I use silica gel packs in my equipment storage cases and keep my recording area well-ventilated. For microphones, especially condensers, avoiding extreme temperature fluctuations helps preserve their internal components.
What tools do I recommend for long-term maintenance?
For quick cleaning, a microfiber cloth and a can of compressed air are invaluable. The compressed air helps remove dust from hard-to-reach places like grille vents or inside connectors. For deeper cleaning, I rely on electronics-safe wipes and a small brush with soft bristles to gently dislodge debris.
To monitor your gear’s health, I suggest using audio interface software that provides real-time status updates and calibration options. Devices like the recommended audio interfaces often include diagnostic tools that alert you to potential issues before they become serious.
Looking ahead, I predict that integrated diagnostics and AI-powered maintenance reminders will become standard features in professional-grade audio equipment. Keeping your gear in top shape now means you’ll be ready to adapt to these upcoming innovations.
Remember, establishing a routine for equipment care not only prolongs the life of your gear but also ensures your recordings stay crisp and clear. Try incorporating a weekly check-up with some of these tools, and you’ll notice a significant boost in your long-term setup reliability.
The Hardest Lessons I Learned About Microphone Mastery
- One of my biggest mistakes was thinking that more expensive equated to better sound. It took me experimenting with mid-range mics and realizing that the key was matching the mic to my environment and needs, not just price. This taught me to prioritize purpose over prestige.
- I used to over-process my audio, relying heavily on editing to fix poor sound. The revelation was that a solid setup and room treatment could reduce post-production time and produce more natural, listener-friendly audio from the start.
- Understanding polar patterns was a game-changer. I once used an omnidirectional mic in a noisy room, which captured every background sound—lesson learned: choose your polar pattern based on your environment and recording style.
- Regular maintenance became clear as essential. Simple steps like cleaning, checking cables, and updating firmware keep my setup reliable and my sound consistent, saving me hours in troubleshooting.
My Essential Toolkit for Longevity and Quality
- Microfiber cloth and electronics-safe cleaner: For quick, effective cleaning of mics and stands—keeping dust and grime at bay.
- Good quality cables and testers: Regularly swapping and testing cables ensures uninterrupted sound and detects issues early.
- Audio interface with diagnostic tools: Up-to-date firmware and built-in health checks help maintain optimal performance.
- Room treatment materials: Acoustic panels and bass traps improve sound quality and reduce unwanted noise.
Embrace the Power of Your Voice in 2024
Remember, your microphone is more than just a piece of gear—it’s an extension of your voice. With careful selection, setup, and maintenance, you can create content that truly resonates. Don’t let technical hurdles hold you back; instead, see them as opportunities to learn and improve. Your best audio is just a setup away, and the journey to mastering it can be as rewarding as the content you produce.
What’s the biggest microphone challenge you’ve faced this year? Share your story below and let’s learn together!
Reading through this comprehensive guide, I can’t help but reflect on my own journey with microphone setup. Like many, I initially believed that investing in a top-of-the-line mic would instantly improve my sound quality. However, I quickly learned that proper placement, environment, and gain settings are just as crucial. I also found that room treatment significantly enhanced clarity, especially in untreated spaces. My biggest challenge was the omnidirectional mic I used in a noisy home office, which captured all background sounds and made editing a nightmare. Switching to a cardioid pattern and adding a simple pop filter made a world of difference. For anyone starting out, I recommend not just focusing on the gear but also investing time in learning about polar patterns and room acoustics. How do others here balance their microphone choice with environment considerations? Would love to hear different setups that have worked well.
This article really hit home for me. I used to think that buying the most expensive mic would automatically make my recordings sound professional, but I quickly learned that environment and proper setup are just as important, if not more so. For my home studio, I started with a decent condenser mic, but the echo and background noise made it impossible to produce quality content until I added some acoustic panels and started paying attention to mic placement. I’ve also found that using a dynamic microphone like the Shure SM7B in my noisy room drastically reduced background sounds, making editing much easier. What has been your experience with balancing equipment choices and environment improvements? Do you think upgrading hardware or enhancing room treatments yields better results in the long run? I’d love to hear how others have navigated this because it’s a constant learning process. Ultimately, investing in the right tools and environment adjustments has made storytelling a lot more enjoyable and less frustrating for me.
This post hits on a fundamental aspect of professional audio production that many beginners overlook: the importance of environment and setup, not just gear. I remember starting out with a decent microphone but recording in an untreated room, which caused a lot of echo and background noise—completely undermining the mic’s potential. It wasn’t until I added some basic acoustic panels and played around with microphone positioning that I saw a huge difference in clarity. One thing I’d add is that not everyone has an ideal space, but even small adjustments like using a reflection filter or choosing the right placement can dramatically improve sound quality. I’ve also found that investing time in learning how to use audio editing tools to clean up recordings helps, but it should never replace proper setup. How do others here effectively manage their environment constraints while trying to optimize audio? Would love to hear some creative solutions that have worked for different spaces.