Ever had that moment during a recording or live stream where your voice just didn’t sound right? Maybe your microphone crackles, picks up background noise, or simply doesn’t capture your voice the way you hear it in your head? I sure have. I remember countless times feeling hopeless, fiddling with settings, trying to improve audio quality, but ending up more frustrated than informed. It was a lightbulb moment when I realized that choosing the right microphone—be it a USB or XLR microphone—isn’t just about price or brand; it’s about understanding what truly suits your voice and recording environment.
Why Getting the Right Microphone Matters More Than Ever in 2024
In 2024, the landscape of content creation has exploded. Podcasts, streaming channels, voice-over gigs—all of it demands clarity and professionalism. But here’s the catch: not all microphones are created equal, and what works for one person may be a nightmare for another. I learned this the hard way early on when I bought a popular microphone based solely on hype. It looked sleek, but in my small, echoey room, it made my voice sound distant and hollow. That mistake taught me an important lesson: understanding the differences between microphone types—and how they interact with your setup—is crucial. Recent studies confirm that proper audio quality significantly increases listener engagement, with clean, clear voice recordings making a serious difference (source). Are you confident your current microphone setup is helping you make a professional impression? Or are you still battling background noise and muddy sound? If so, you’re not alone. Many creators face this challenge, and I’m here to help you find the perfect solution tailored for 2024.
Choose the Right Microphone Type
Start by selecting the microphone that fits your recording environment and goals. A USB microphone is ideal for ease of use and quick setup, making it perfect for beginners or those recording in less controlled spaces. Conversely, an XLR microphone offers higher audio quality and flexibility for professional sound, but requires an audio interface. Reflect on your space, budget, and quality needs before making a choice. During my first attempt, I opted for a popular USB mic based solely on reviews, but upcoming sound issues made me realize I needed a more robust option. That led me to test different models and understand their strengths in various contexts.
Optimize Your Recording Environment
Acoustic treatment is crucial. Use foam panels, blankets, or diffusers to reduce echo and background noise. I once set up my mic in a small, untreated room, and every whisper or keyboard click became prominent. Adding simple foam panels and choosing a quiet time dramatically improved my audio clarity. Remember, even the best mic can’t compensate for a noisy environment. Place your mic away from reflective surfaces and background distractions, aiming for a controlled space that enhances your voice. For an effective sound space, consider a directional microphone that focuses on your voice and blocks out surrounding noise. For detailed tips, check out this guide.
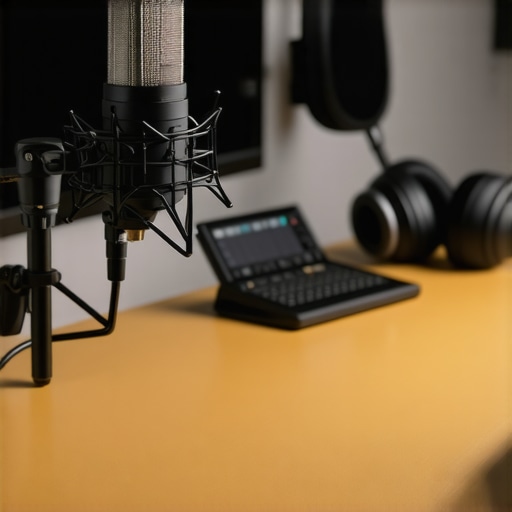
Set Up Proper Microphone Positioning
Position your microphone close to your mouth—about 6-8 inches—at a slight angle to avoid plosive sounds. During a recent recording, I experimented with distances and found that being too close caused harshness, while too far resulted in faint audio. Use a sturdy mic stand or boom arm to keep a consistent position. For XLR mics, monitor your gain and positioning carefully; too high gain introduces noise, too low loses detail. For USB mics, tweak the cardioid pattern and sensitivity settings in your software. Remember, consistency in placement significantly improves your audio quality over time. For visual reference, an image illustrating optimal mic positioning can be found “>here.Many creators believe that choosing the most expensive microphone automatically guarantees professional sound. However, this is a misconception. Often, people overlook the nuances that distinguish a good microphone from a great one. For example, a common myth is that all XLR microphones naturally produce superior quality compared to USB mics. In reality, modern USB microphones with advanced built-in digital signal processing can outperform outdated XLR models, especially in untreated environments. The key lies in understanding your specific needs and environment rather than blindly chasing high-end gear. Another sneaky trap is assuming that a microphone’s build quality equates to better sound. A sturdy, metal-bodied mic might be appealing, but if it has a hypercardioid pattern, it might ignore important ambient cues, resulting in a boxed-in sound. Conversely, a mic with a broader pickup pattern can provide more natural recordings if positioned correctly. Advanced users also often get caught up in gain staging—setting the input levels too high or too low—leading to unwanted noise or weak signals. Proper gain management, coupled with correct placement, is crucial for optimal audio. Furthermore, many overlook the impact of acoustics on recording quality. Investing in the best microphone won’t help if your room has echo or background noise; acoustic treatment becomes the silent partner here. Studies by audio engineers highlight that even the finest microphone benefits from a well-treated space and strategic positioning. For instance, using a directional microphone like a cardioid or hypercardioid can help focus on your voice and minimize room noise, but only if you understand how to position it effectively. This attention to detail, combining gear choice with environment optimization, is what separates average recordings from professional-sounding content. Remember, the goal is clarity and consistency—not just gear sophistication. To explore more about selecting the right microphone type tailored to your voice and setup, check out this guide on voice recording and streaming microphones for 2024. Don’t fall for myths like
Keep Your Gear Running Smoothly with Proper Maintenance
Maintaining your microphone equipment is crucial to ensuring consistent, professional-quality audio. Regularly inspecting your XLR or USB microphone, cables, and accessories can prevent unexpected failures during recordings or live streams. I personally make it a habit to check all connections before each session, ensuring that no loose cables or dust particles impair sound quality. Using compressed air to clean connector ports and wiping the microphone with a soft, lint-free cloth keeps them in optimal condition. Additionally, updating your firmware and software drivers for audio interfaces or mixer software ensures compatibility and access to the latest features, a practice I recommend for anyone serious about long-term performance.
Tools I Recommend for Easy Maintenance
For cleaning, I rely on a gentle microfiber cloth and electronic contact cleaner for connectors. The best microphones in 2024 often come with recommended cleaning routines from manufacturers—following these can extend their lifespan. For software, tools like Reaper or Adobe Audition are essential for post-production and calibration. These programs allow fine-tuning of your input gain and noise reduction, providing a consistent sound profile over time. Moreover, using a dedicated audio interface like the best USB/XLR interfaces of 2024 ensures clean, reliable connections and often includes features to compensate for environmental noise or signal distortion.
Anticipate Future Trends and Equipment Upgrades
The landscape of podcasting and streaming is continuously evolving. I predict that integrated digital processing will become standard in microphones themselves, reducing reliance on external software. Keeping abreast of firmware updates, such as those provided by top gear for 2024, can keep your setup state-of-the-art. Investing in versatile tools that upgrade easily and support multiple microphone types will provide flexibility as your needs grow. For example, a quality combination interface capable of handling both USB and XLR mics offers long-term utility, making scaling feasible without replacing entire systems.
How do I maintain my microphone setup over time?
The key is regular upkeep, including cleaning, software updates, and testing connections before each session. Incorporate routine checks into your workflow, and don’t hesitate to trial advanced tools like digital noise suppressors integrated into your interface or software. For instance, exploring the detailed settings of your audio interface’s gain controls or applying external plugins can dramatically improve audio clarity and reduce background noise, especially for dynamic environments. I highly recommend trying specific techniques, such as calibrating your gain settings with test recordings to identify the optimal input levels— consistent calibration ensures high-quality output on every episode or stream. Check out this expert guide for more insights into maintaining pristine audio quality over the long haul.
The Bold Lessons My Microphone Journey Taught Me
One of the toughest realizations was that equipment alone doesn’t make your voice sound professional; understanding your environment and voice dynamics is key. I remember investing in a top-tier XLR microphone, only to discover it accentuated room echo because I overlooked room acoustics. That taught me that gear demands context, and matching your microphone type to your space can unlock true audio quality. I also learned that consistent mic positioning and regular maintenance—like cleaning contacts and updating drivers—are the silent heroes of pristine recordings. Additionally, I uncovered that some myths, like “Expensive gear always wins,” can hold creators back, emphasizing instead the importance of proper setup and understanding over price tags.
This post really hits home about the importance of environment and setup in achieving professional audio quality. Like many others, I started with a decent USB microphone for quick convenience, but I quickly realized that room acoustics played a huge role in how my voice sounded. I added some acoustic panels and moved my mic closer, which made a massive difference. It made me reflect on how often creators overlook the room in favor of equipment. I’ve found that investing in a good directional mic is helpful, but without proper placement and environment control, it’s like putting lipstick on a pig. Has anyone experimented with specific acoustic diffusors or DIY solutions that really made a difference in their recordings? I’d love to hear what’s worked for others trying to optimize their space on a budget.