It was a moment I won’t forget—recording my first podcast episode, microphone in hand, and suddenly realizing that my voice sounded tinny, echoey, and almost unlistenable. I had invested so much in a shiny USB mic, hoping it would elevate my content, but the truth hit me hard: my cramped, untreated room was sabotaging my sound. Frustration crept in as I juggled audio filters and low-quality solutions that only made things worse. That was my lightbulb moment. I learned that, in 2026, the real professionals are shifting gears—embracing dynamic microphones in carefully treated rooms—and I knew I had to do the same. So, what’s driving this trend, and how can you benefit from it? Today, I’ll share the secrets behind why top creators are making this switch and how you can do it too, even if your space isn’t perfect.
The Shift Toward Dynamic Mics: Why Pros Are Doing It in 2026
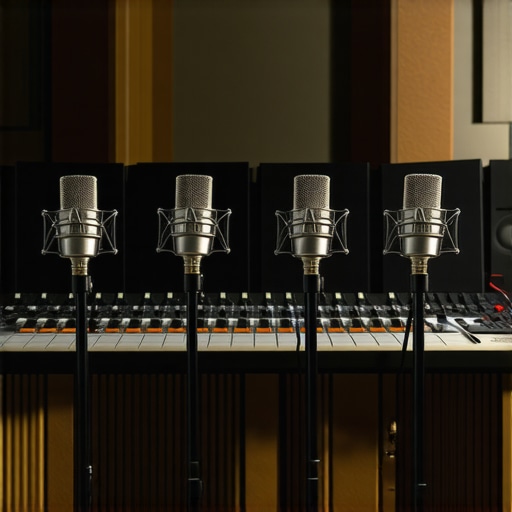
Many content creators and streamers are discovering that the key to professional-grade audio isn’t just about buying the latest fancy microphone. It’s about choosing the right mic for your environment and understanding the acoustics. In recent years, dynamic microphones have surged in popularity—especially among pros working in less-than-ideal rooms—because they excel at rejecting unwanted noise and minimizing room reflections. Unlike condenser mics, which are sensitive and prone to capturing echo and background noise, dynamic mics focus on your voice, making your recordings clearer and more consistent.
From beginner podcasters to veteran streamers, the trend is clear: adapting to less acoustic-friendly spaces is more manageable with a dynamic microphone. Early on, I made the mistake of investing solely in condenser mics without considering room treatment, which led to numerous retakes and editing sessions. Looking back, I realize that understanding how to leverage the right mic in a treated room could’ve saved me time and frustration. If you’re wondering whether this switch is worth it, I recommend checking out [this article](https://microphones.creatorsetupguide.com/5-new-usb-microphones-for-2026-that-filter-keyboard-noise) that highlights how top creators are filtering out keyboard noise and room echoes using dynamic mics.
Are you tired of battling echo and background noise in your recordings? If so, you’re not alone. Many content creators face similar frustrations, and the good news is that there are practical, proven methods to improve your sound quality. Next, I’ll walk you through the main reasons why dynamic microphones are becoming the go-to choice in 2026 and how you can start benefiting from this trend today.
Choose the Right Microphone for Your Space
Start by selecting a dynamic microphone, which is designed to focus on your voice and reject ambient noise. Unlike condenser mics, which are sensitive and pick up every echo, dynamic mics excel in untreated rooms. Take my personal experience: I swapped my condenser for a Shure SM7B and immediately noticed less room noise in my recordings. To ensure it works well, pair it with a quality audio interface that supplies adequate gain—check out [this guide](https://microphones.creatorsetupguide.com/3-reasons-your-xlr-microphone-sounds-quiet-in-2026-and-the-fix) for gain tips.
Optimize Your Room for Better Acoustics
Even with a dynamic mic, your environment matters. Focus on reducing echo and reverb by adding soft materials around your recording area. Think of it like building a mini recording booth—blankets, foam panels, or even thick curtains can make a huge difference. For quick fixes, see [these tips](https://microphones.creatorsetupguide.com/stop-harsh-sibilance-4-fast-2026-fixes-for-crisp-voice-recording). When I recorded my first podcast in my small office, I hung blankets on the walls and placed a bookshelf nearby to diffuse reflections—immediately, my voice became clearer, with less ambient sound.
Position Your Microphone for Clarity
Proper placement is crucial. Position the mic about 6-8 inches from your mouth, slightly off-axis to avoid plosive sounds. Use a boom arm or a shock mount to keep the mic steady. I learned this the hard way—after accidentally hitting my mic stand during recordings, I switched to a flexible boom arm, which prevented vibrations and kept my voice centered. For advanced positioning techniques, see [this article](https://microphones.creatorsetupguide.com/5-pro-tactics-to-position-an-xlr-microphone-in-a-2026-echoey-room).
Implement Effective Soundproofing Measures
Simple barriers or DIY solutions can block unwanted noise. Place a shield or a makeshift barrier around your mic to reduce keyboard sounds, mouse clicks, and household noise. Consider shielding your setup with materials like cardboard or foam panels—avoid relying solely on heavy foam, as they often cause muffling. I attempted to soundproof my room with egg cartons initially, but full coverage with acoustic foam yielded much better results. For quick soundproofing tricks, check [this guide](https://microphones.creatorsetupguide.com/ditch-the-foam-4-better-ways-to-soundproof-your-mic-in-2026).
Tweak Your Audio Settings for Professional Quality
Adjust gain levels to prevent clipping—keep the gain high enough to capture your voice but not so high that it causes distortion, which can be fixed with [these tips](https://microphones.creatorsetupguide.com/stop-clipping-3-quick-gain-stages-for-2026-audio-interfaces). Use a noise gate to cut background sounds between sentences and equalization to brighten muddy voices. I used a simple EQ preset to enhance clarity, which you can replicate with [this quick trick](https://microphones.creatorsetupguide.com/3-quick-eq-tricks-to-fix-a-thin-streaming-mic-voice-2026). Properly setting your levels and applying filters ensures your voice sounds crisp and natural, even if your room isn’t perfect.Many beginners believe that selecting the most expensive XLR microphone automatically guarantees studio-quality sound. While high-end gear certainly helps, it’s a misconception that the microphone alone defines your audio’s clarity. In reality, improper setup or neglecting room acoustics often outweigh the benefits of premium equipment. For example, even a top-tier condenser mic can produce muddy recordings if the room isn’t treated properly, leading many to erroneously think their mic is faulty when the issue lies elsewhere.
What Advanced Users Overlook When Choosing a Podcast or Streaming Microphone?
One critical oversight is the focus on microphone type without considering the recording environment. Most people assume that switching from a USB mic to an XLR setup automatically boosts quality. However, without attention to gain staging, cable quality, or proper positioning, the upgrade can be negligible or even worsen the sound. Dynamic microphones, for instance, are often recommended for noisy environments, but many forget that proper gain control and acoustic treatment are necessary to optimize their potential. Interestingly, some studies suggest that post-processing equalization and noise gating can be more impactful than the choice of microphone itself if used correctly (see expert analysis in industry publications). Additionally, many fall into the trap of thinking that more expensive accessories—like shock mounts or pop filters—are a substitute for good microphone placement and room acoustics. The real secret lies in mastering the setup process to complement your gear, not just buying the latest equipment. For insight into common setup pitfalls and how to avoid them, check out guides on fixing echoey recordings or harsh sibilance, which often stem from misconfigured microphones rather than hardware deficiencies. Lastly, understanding how to craft a balanced signal chain—including correct gain, proper cabling, and suited interfaces—can dramatically improve your audio quality, regardless of the mic’s price point. Investing in knowledge about these nuances makes a significant difference in achieving professional-grade sound without overspending. Have you ever fallen into this trap? Let me know in the comments.Maintaining your podcast or streaming setup is crucial for consistent, high-quality audio. One of my most valuable investments has been the **Audio-Technica AT2035** condenser mic, which offers excellent clarity but requires regular care to keep performing at its best. I personally clean the mic grille monthly with a soft, lint-free cloth and keep it in a dust-free environment to prevent dust accumulation that can affect sound quality. Regularly inspecting your XLR cables for signs of wear or corrosion is another habit I highly recommend—loose or damaged cables can introduce noise or reduce volume, leading to frustrating troubleshooting sessions. For this, I use the **Canare L-4E6S** star quad cables, which are durable and shielded, reducing interference and ensuring clear signals over time.
Software maintenance shouldn’t be overlooked. I swear by **Reaper** for editing due to its stability and low resource consumption, which means fewer crashes during long recording sessions. Keep your DAW updated to benefit from the latest performance improvements and bug fixes. Additionally, regularly backing up your configuration files and presets can save hours if anything ever corrupts your setup.
When it comes to long-term results, I recommend investing in a **Furman M-8X2** power conditioner to protect your gear from power surges and voltage fluctuations—crucial for avoiding hardware damage and ensuring consistent performance. Over time, dust and power issues can cause your gear to degrade, so consider creating a maintenance schedule to check connections, clean components, and update firmware.
As for scaling, when expanding your setup, I suggest upgrading to a **Focusrite Clarett 2Pre USB** audio interface. Its solid build and high-quality preamps will accommodate a growing microphone array without sacrificing sound quality. Regularly checking for driver updates from manufacturers like Focusrite ensures compatibility and optimal performance as your setup evolves.
The future of voice recording will likely lean toward AI-assisted noise reduction and auto-leveling tools, minimizing manual adjustments. Staying proactive with your gear maintenance and software updates will keep you ahead of technical issues, allowing you to focus on content creation.
To keep your setup working flawlessly, I challenge you to implement a weekly cleaning routine, including inspecting cables, cleaning mic surfaces, and updating your software. This small effort can save you hours of troubleshooting and preserve your audio quality for years to come. For more tips on maintaining your equipment, check out the detailed guide on fixing echoey rooms, which also covers environment-specific maintenance strategies.
Lessons From the Trenches of Voice Tech
One of the biggest surprises I encountered was realizing that the gear I trusted—thinking it was enough—often wasn’t the entire story. I used high-end condenser mics without considering how my untreated room was sabotaging my recordings. That taught me that equipment is only part of the equation; environment and technique are just as critical. I also learned that even seasoned creators fall into the trap of assuming more expensive gear automatically guarantees pro results. The true insider secret is understanding how to optimize every element around your microphone, from placement to acoustics, to unlock its full potential.
Another lightbulb moment was discovering how many top creators leverage simple yet effective tweaks—like basic room treatment or smarter mic positioning—to make a huge difference. It’s tempting to chase after shiny hardware upgrades, but sometimes, the most impactful improvements come from fine-tuning what you already have. For instance, adjusting your gain correctly or using DIY soundproofing can transform your sound without breaking the bank. These lessons have motivated me to adopt a holistic approach—focusing on both gear and environment—for consistently high-quality voice recordings.
Blueprints for Building Your Audiophile Sanctuary
Some tools and resources changed the game for me and are worth sharing. I swear by the 3 reasons your XLR microphone sounds quiet in 2026 article, which helped me solve gain issues that plagued my early recordings. Investing in a quality audio interface like the Focusrite Clarett series made a noticeable difference in clarity and headroom. For quick fixes on echo and reverb, I refer to this guide that offers ready-to-implement tips. And for environment improvements, soundproofing strategies I’ve used to reduce echo are invaluable. Combining these resources with patience and experimentation helped me craft a space that elevates my voice recordings beyond the average.
Shape Your Path and Embrace the Future of Voice Recording
Taking control of your voice journey means understanding it’s a continuous process, not a one-time setup. The future will see smarter, AI-driven tools that help automate room correction, leveling, and noise suppression—so staying curious and proactive with your gear maintenance will be vital. Remember, every creator’s space is unique, and there’s a personal reward in mastering yours. Don’t wait for the perfect room—start with what you have, learn the nuances, and keep improving. Your voice deserves to be heard in its best form, and with the right mindset and tools, you can make it unforgettable. So, are you ready to take your voice recordings to the next level, even in less-than-ideal spaces? I’d love to hear about your challenges and victories in the comments below!