Getting Started: My Personal Microphone Quest
When I first delved into the world of podcasting and live streaming, I quickly realized that choosing the right microphone could make or break the quality of my content. I remember spending hours researching, reading reviews, and testing different models. My journey led me to discover some incredible USB and XLR microphones that are perfect for both beginners and seasoned pros in 2024.
Why I Switched to Professional Microphones for Streaming
Initially, I used a basic USB mic, but as my audience grew, I noticed that my audio lacked clarity and depth. After exploring options on sites like Creator Setup Guide, I decided to upgrade. Investing in a quality microphone transformed my recordings, making them sound more professional and engaging.
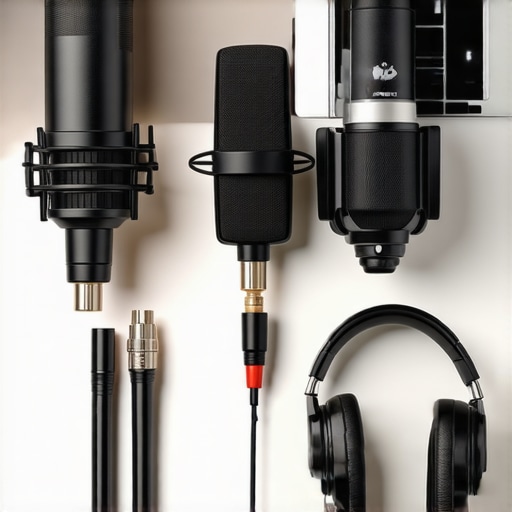
My Top Picks for Podcasting & Streaming in 2024
Based on my personal experience and extensive research, here are some of the best microphones I recommend for 2024:
- Blue Yeti X – An excellent USB mic known for its versatility and crystal-clear sound, perfect for beginners and intermediate users alike.
- Shure SM7B – A legendary XLR microphone favored by podcasters and broadcasters for its warm tone and noise rejection.
- Audio-Technica AT4040 – A condenser mic that offers studio-quality sound, ideal for those serious about their audio quality.
For those who want the best of both worlds, combining USB and XLR options, can be a game-changer. I personally use a hybrid setup that allows me flexibility depending on the recording environment.
What Makes a Microphone Stand Out for Streaming?
In my experience, the key features include excellent noise cancellation, durability, and ease of use. Microphones like the RODE NT1-A or Elgato Wave 3 have impressed me with their robust build and user-friendly interfaces. The right mic can significantly elevate your audio quality, making your content more professional and trustworthy.
How Do I Know if a Microphone Is Right for Me?
This is a question I often ask myself. The answer depends on your specific needs—whether you prioritize portability, studio-quality sound, or budget. Reading reviews and testing different models can help you find your perfect match. For detailed comparisons, I recommend checking out the top voice recording microphones.
If you’re serious about boosting your streaming or podcasting setup, I’d love to hear about your experiences. Drop a comment below or share your favorite microphone picks for 2024!
Beyond Basics: How Microphone Quality Shapes Your Content’s Authenticity
One aspect that often goes unnoticed in the quest for perfect audio is how a microphone’s quality directly influences your content’s authenticity and listener trust. High-end microphones, such as the Neumann TLM 103 or the AKG C414, offer a depth and clarity that can make your voice sound more natural and engaging, which is crucial for establishing credibility with your audience. As highlighted by industry professionals and audio engineers in resources like Creator Setup Guide, investing in top-tier microphones ensures your voice remains truthful and compelling across various recording environments.
How Do You Choose Between USB and XLR Microphones for Long-Term Success?
Understanding the fundamental differences between USB and XLR microphones is essential for making an informed decision. USB microphones are praised for their simplicity and plug-and-play convenience, making them ideal for newcomers or those with limited space. However, XLR microphones, such as the Shure SM7B or Electro-Voice RE20, provide superior sound quality and flexibility with professional audio interfaces. This flexibility allows for better sound customization, noise reduction, and future scalability, which are vital for serious content creators aiming for broadcast-quality output. For comprehensive guidance on this topic, check out the best USB and XLR microphone options.
What Are the Practical Considerations When Upgrading Your Microphone Setup?
Upgrading your microphone isn’t just about the device itself; it involves considering your entire setup—acoustic treatment, interface, and environment. For example, a high-end microphone paired with a poor room can negate its benefits. Acoustic panels, a quality pop filter, and a stable stand are equally important to optimize your audio quality. Additionally, investing in a good audio interface, like the Focusrite Scarlett 2i2, ensures your microphone performs at its best. Remember, the goal is to create a cohesive system where each component complements the other, resulting in professional-grade recordings.
How Can I Test and Fine-Tune My Microphone for Optimal Performance?
Testing and fine-tuning are crucial steps in achieving top-tier audio. Start by recording in your typical environment and listening critically for noise, distortion, or inconsistencies. Using software like Reaper or Audacity, you can adjust gain settings, equalization, and compression to enhance clarity. A good rule of thumb is to aim for consistent volume levels and natural voice reproduction. Regularly updating your microphone drivers and software also helps maintain peak performance. Remember, fine-tuning is an ongoing process that evolves with your content style and environment.
If you’re eager to explore more about premium microphones and how they can elevate your productions, I recommend reviewing the top professional-grade microphone picks for 2024. Also, share your experiences or questions in the comments—I love learning from fellow creators and helping you refine your audio game!
Reflections on Microphone Evolution: From Simple to Sophisticated
As I look back on my journey through the world of audio quality, I realize how much my understanding has deepened over time. Initially, I thought any microphone would do, but as I started investing more seriously, I uncovered a universe of nuanced differences that can dramatically impact your content’s authenticity. For instance, I found that condenser microphones like the Audio-Technica AT4040 offer a richness that dynamic mics sometimes struggle to replicate, especially in controlled environments. This realization pushed me to experiment with different setups, including acoustic treatments, to maximize clarity and naturalness. It’s fascinating how a seemingly simple choice like a microphone can unlock layers of professionalism and trustworthiness in your recordings.
The Nuances of Choosing Between USB and XLR: Beyond the Basics
One of the more complex decisions I faced was whether to stick with USB microphones or invest in XLR systems. At first glance, USB is undeniably convenient—plug and play, straightforward, and perfect for quick setups. But as I delved into more advanced productions, I appreciated the flexibility that XLR offers, especially when paired with quality interfaces like the Focusrite Scarlett 2i2. XLR setups allow for better noise isolation, more precise sound shaping, and future scalability. I’ve learned that choosing the right setup depends heavily on your long-term goals—whether you prioritize ease or professional-grade sound. For a comprehensive comparison, I recommend exploring the detailed guides on [best USB and XLR options](https://microphones.creatorsetupguide.com/best-usb-xlr-microphones-for-podcasting-streaming-in-2024).”,
Refining Your Audio Arsenal: When to Invest in High-End Microphones
As I’ve progressed in my audio journey, my understanding of what truly elevates a podcast or stream has deepened substantially. Investing in top-tier microphones like the Neumann TLM 103 or the AKG C414 isn’t merely about sound quality—it’s about crafting an authentic auditory experience that resonates trust and professionalism. These microphones capture nuances in voice that lesser equipment often miss, and their ability to faithfully reproduce natural tones is invaluable for content creators seeking to build credibility. Industry standards, as explored in detailed reviews by Creator Setup Guide, emphasize the importance of microphone fidelity in establishing audience connection and long-term engagement.
Integrating Advanced Acoustic Treatments for Optimal Microphone Performance
Beyond choosing the right microphone, I discovered that the environment plays an equally critical role. Acoustic treatment—such as bass traps, diffusers, and high-quality foam panels—can dramatically improve sound clarity by reducing echoes and unwanted background noise. When I upgraded my space, I noticed a tangible difference in my recordings’ warmth and intimacy. This pursuit of sonic perfection led me to experiment with DIY solutions versus professional installations, ultimately realizing that tailored acoustic environments maximize the potential of even modestly priced microphones. Incorporating these treatments, combined with strategic microphone placement, allows for cleaner recordings that require less post-production editing, saving time and preserving authenticity.
What Are the Hidden Benefits of Using a Quality Pop Filter and Shock Mount?
Microphone accessories like pop filters and shock mounts often seem like minor additions, but their impact on sound quality is profound. A high-quality pop filter, such as those compatible with the best professional microphones, minimizes plosive sounds and protects the capsule from moisture, extending device longevity. Similarly, shock mounts isolate the microphone from vibrations and handling noise, which I found essential when recording in less-than-ideal environments or during energetic sessions. These accessories are investments in maintaining consistent audio quality, and their proper use can prevent costly re-records or post-processing corrections, ensuring your voice remains clear and natural across every episode.
How Do I Balance High-End Equipment with Practical Workflow Considerations?
One challenge I faced was integrating premium microphones into a workflow that remains efficient. High-end gear, while offering exceptional sound, often involves complex setups and maintenance routines. To streamline my process, I adopted a modular approach—using versatile interfaces like the Focusrite Scarlett 2i2 for XLR connections or quick-switch USB interfaces for portability. I also developed standardized recording and post-production protocols to minimize setup time without sacrificing quality. This balance between high fidelity and workflow efficiency is crucial for content creators juggling multiple projects or live sessions. Advanced tools and thoughtful organization enable me to deliver professional-grade audio consistently, even under tight schedules.
For those ready to push beyond basic setups, I highly recommend exploring the nuances of professional-grade microphone choices and environment optimization. Sharing your experiences or questions about integrating high-end gear into your workflow can open new avenues for growth. Feel free to connect or comment—I’m always eager to exchange insights and help fellow creators elevate their audio craftsmanship.
Things I Wish I Knew Earlier (or You Might Find Surprising)
The Hidden Impact of Microphone Quality
Looking back, I realize how much investing in a high-quality microphone changed my content. Early on, I thought any mic could do the job, but I underestimated how much richer and more authentic my voice sounded with professional gear like the Neumann TLM 103. It’s one of those lessons that took my audio from decent to truly engaging.
The Power of Proper Acoustic Treatment
Another surprise was how much environment influences sound. I used to record in a noisy room, but adding simple acoustic treatments like foam panels and bass traps made a huge difference. It’s incredible how a few tweaks can elevate your microphone’s performance, making your recordings sound professional without breaking the bank.
Why I Wish I Had Started with XLR
Initially, I loved the simplicity of USB mics, but I eventually switched to XLR for better sound quality and future scalability. The flexibility of pairing an XLR microphone with a quality interface like the Focusrite Scarlett 2i2 opened doors to more control and cleaner recordings. It’s a game-changer for serious creators.
The Role of Accessories in Sound Quality
Pop filters and shock mounts might seem minor, but they really protect your mic and improve clarity. I’ve learned that these accessories prevent unwanted noise and plosive sounds, ensuring your voice stays natural and professional in every recording. They’re small investments with big returns.
Balancing Quality and Workflow
High-end gear can sometimes feel overwhelming or slow down my workflow, but I found that having a streamlined setup—like quick-attach interfaces and standardized routines—helps me maintain quality without hassle. It’s all about finding that sweet spot where top sound meets efficiency.
Resources I’ve Come to Trust Over Time
- Creator Setup Guide – A comprehensive resource that helped me understand the nuances of microphone choices and setups. It’s my go-to for detailed reviews and comparisons.
- Sweetwater’s Blog – Offers expert insights into audio gear and acoustic treatments, perfect for DIY enthusiasts looking to upgrade their space.
- Recording Revolution – Provides practical tips on recording techniques, making high-quality sound achievable even on a budget.
Parting Thoughts from My Perspective
Choosing the right microphone for podcasting and streaming in 2024 isn’t just about tech specs; it’s about creating an authentic connection with your audience. From understanding the differences between USB and XLR to investing in acoustic treatments and accessories, every step plays a role in elevating your content. Remember, the most important thing is to start where you are and keep refining your setup. If this resonated with you, I’d love to hear your thoughts or experiences—drop a comment below or share this with someone who’s ready to upgrade their audio game!
Reading this post really resonated with me, especially the part about how environment and acoustic treatment impact your microphone’s performance. I used to record in a completely untreated room, and despite having decent gear, the background noise and echoes sometimes distracted from my voice clarity. Since I added acoustic panels and a good pop filter, the quality of my recordings has improved tremendously, and I notice less post-production work now. It’s fascinating how such small adjustments can unlock the true potential of high-end microphones. I’ve also been experimenting with different mic placement techniques because I realized that even the most expensive setup can underperform if positioned poorly. I’m curious—what are some of your favorite tips or tricks for optimizing microphone placement in small or unconventional spaces? I think this is a crucial step for creators who want professional sound without necessarily having a dedicated studio.
This post really hits home for me, especially the emphasis on environment and equipment. I’ve been through a similar journey, starting with basic USB mics and gradually moving to XLR setups as my workflow and audience grew. I completely agree that proper acoustic treatment, like adding foam panels and bass traps, makes a noticeable difference. In my experience, the placement of the mic also plays a huge role—I’ve found that positioning the mic slightly off-center and at mouth level reduces plosive sounds while capturing a more natural tone. Have you tried using a boom arm or adjustable stand? It can really help optimize placement in tight or unconventional spaces. I’m curious—what are some of your go-to techniques for ensuring consistent quality when recording in different environments? I think a combination of environment, positioning, and good gear is what truly elevates the overall sound to professional levels.
I really appreciate this detailed walkthrough of your journey with microphones! I’ve also found that switching from basic USB mics to XLR setups, especially when paired with proper acoustic treatment, can truly elevate audio quality. One thing I discovered along the way is the importance of room acoustics—not just with panels but also with smarter mic placement, like keeping the mic at a consistent distance from your mouth and avoiding reflective surfaces nearby. Have you experimented with different types of pop filters or shock mounts? I’ve noticed that these accessories can sometimes make a big difference in reducing plosives and handling noise, especially in less-than-ideal recording environments. For creators just starting out, what are some budget-friendly tips you would recommend to improve sound quality without investing in high-end gear immediately? I think focusing on environment and minor adjustments often yields surprisingly professional results without breaking the bank.
This post really underscores the importance of starting with a solid foundation when upgrading your podcast or stream setup. I agree that environment plays such a huge role; I once recorded in a room with reflective surfaces and it made my audio sound harsh and muddy until I added some DIY acoustic panels using foam tiles. It was a game changer. I also find that mic placement can be tricky — sometimes even just angling the mic slightly away from major noise sources helps a lot. I’m curious, how do others find the best positioning for mics in smaller or cluttered spaces? Do you prefer overhead stands or desktop mounts for better stability and flexibility? I’ve been considering a boom arm, but space is limited in my setup, so any tips would be appreciated. Overall, I think investing in environmental improvements and proper mic placement can often make as much difference as the gear itself.
Reading through this post really resonated with me, especially the part about how much environment and mic positioning can influence sound quality. I started out with a basic USB mic, and I was surprised at how much background noise and echo affected my recordings. It wasn’t until I added some DIY foam panels and experimented with mic placement that I noticed a real difference — especially placing the mic slightly off-axis to reduce plosives and echo. I also found that a sturdy boom arm helps keep the mic consistent at the right distance, which is super helpful in small or cluttered spaces. One thing I’ve learned is that cheap acoustic treatments and simple mic placement tweaks can often do more for audio quality than expensive gear alone. I’d love to hear from others—what are your favorite affordable DIY acoustic fixes or placement tips? It seems like every little improvement can dramatically boost professionalism in your recordings.
This post really hits home for me, especially the emphasis on environment and mic placement. I started with a basic USB microphone, and despite having decent equipment, I struggled with background noise and echo. Once I added some DIY acoustic panels and a good quality pop filter, the difference was night and day. It’s fascinating how small modifications can unlock the full potential of even a modest setup. I’ve found that mic placement is just as crucial—placing the mic slightly off-center and at mouth level really helps in capturing a more natural vocal tone while minimizing plosives. Have you experimented with different mic positions or accessories like shock mounts or boom arms? I’d love to hear how others optimize their setups in limited or unconventional spaces. Also, any budget-friendly tips you’ve found particularly effective? I believe that with the right environment and a little bit of trial and error, anyone can produce professional-sounding audio without a hefty investment.
This post really highlights the importance of starting with a solid setup and understanding how environment and gear influence audio quality. I started with a basic USB microphone as well, but once I invested in a quality XLR mic and treated my room acoustically, the difference was night and day. Practical tips like using a pop filter and positioning the mic at mouth level made a big impact. What really helped me was experimenting with mic placement—keeping it slightly off to the side to reduce plosives while maintaining a natural sound. I also found that a sturdy boom arm helps keep the mic steady and at the perfect distance, especially in small spaces.
For those on a budget, I recommend focusing on acoustic treatment elements like foam panels or even DIY solutions, as they offer great value. Do you have any favorite DIY acoustic treatment ideas or budget-friendly accessories that worked well for you? It’s amazing how small adjustments can bring professional-level audio to your recordings without needing the most expensive gear.
Reading this post really hits home for me. When I first started, I underestimated just how much environment and proper mic placement can impact the overall sound. I remember recording in a small, untreated room, which introduced quite a bit of echo and background noise, even with a decent mic. Since I added some DIY foam panels and adjusted my mic positioning—placing it slightly off-center and at mouth level—the clarity of my recordings has improved substantially. What’s been most helpful is experimenting with different mic angles and distances to find that sweet spot, especially in small or cluttered spaces. Have you tried using a shock mount or a different type of pop filter? I found that these accessories make a surprisingly big difference in minimizing handling noise and plosive sounds. For anyone on a budget, focusing on simple acoustic treatments and proper placement can often deliver surprisingly professional results. What are your favorite DIY solutions for acoustic treatment or tips for placing mics in unconventional environments?