Ever been in the middle of a live stream or recording session, only to realize your heavy breathing is stealing the show? I remember the first time I noticed it—my breath sounded like a wind tunnel, and I was sure viewers could hear every inhale and exhale, making me self-conscious and distracted. That lightbulb moment made me realize: my microphone position was sabotaging the quality of my voice, and I didn’t even know it.
The Power of Proper Microphone Positioning
If you’re serious about creating professional-sounding content in 2026, understanding how to position your streaming mic is crucial. Not only does the right placement enhance your voice clarity, but it also helps conceal those unavoidable heavy breaths. Yet, many beginners fall into the trap of setting their mics incorrectly, leading to issues like muffled sound, plosive pops, or exaggerated breathing noise. The good news? With a few strategic adjustments, you can dramatically improve your audio quality and keep your audience engaged.
Could Your Mic Placement Be Making Your Breathing Audible?
One common mistake I made early on was placing my mic directly in front of my mouth, which amplified every heavy breath and mouth click. Instead of hiding the breathing, I was drawing attention to it. After experimenting, I discovered that positioning the mic slightly off-axis or below my mouth helped reduce these unwanted sounds. For more detailed tips on avoiding boxy or dull recordings, check out this guide to fixing common voice recording issues in 2026.
So, if heavy breathing has been a persistent distraction during your streams or recordings, don’t worry—you’re not alone. Many creators overlook the impact of mic positioning, but once you master the art of placement, your voice will sound much more polished and professional. Let’s explore how to achieve this in the next sections, and sure enough, you’ll be surprised at how simple adjustments can make a huge difference.
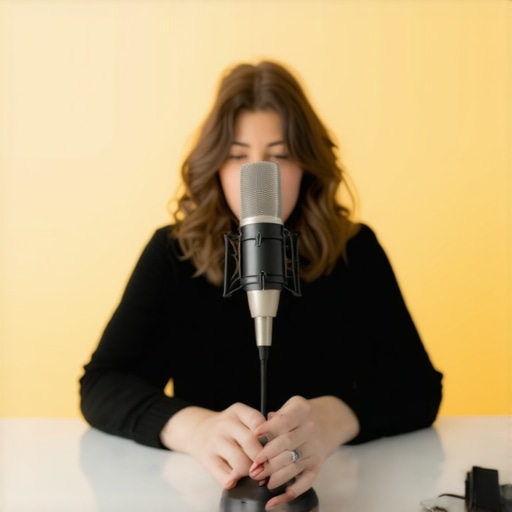
Adjust Your Microphone Height and Angle
Start by positioning your microphone at mouth level or slightly below. Imagine it as a camera lens: getting it too high or low distorts your voice. For example, I once left my USB mic on my desk, and it was pointed upwards, causing muffled sound. I corrected this by lowering the mic and angling it slightly away from my mouth, which instantly improved clarity and reduced breath noise. This technique applies whether you use an XLR or USB microphone, and can be fine-tuned by experimenting with angles until your voice sounds natural. For more tips on eliminating muffled sound, check out this guide to fixing muddy voice recordings in 2026.
Use Proximity to Control Volume and Tone
Place the mic about 6 to 12 inches from your mouth—closer for louder, more intimate sound, further away to soften it. This is akin to a camera zoom: closer gets details, farther blurs background. I once recorded a podcast with my dynamic XLR mic too far away, leading to weak, echoey vocals. Moving it closer, I ensured consistent distance, resulting in richer tones and reduced background noise. Remember, proximity also influences tone; closer mics sound bassier, so adjust accordingly, especially if your mic is overly bassy—see how to fix that in this article about 2026 streaming mic fixes.
Reduce Breathing and Mouth Noises
Position the mic slightly off-axis—just to the side of your mouth—so heavy breaths and mouth clicks aren’t directly pointed into it. Think of it as speaking past a megaphone to avoid distortion. Once, I used my mic directly in front, and every breath sounded loud and distracting. Shifting to an off-axis position minimized these sounds dramatically. Additionally, use a pop filter or foam windscreen—these act like shields—diffusing air blasts and making breaths less prominent. If heavy breathing remains an issue, explore techniques like controlled breathing or dynamic mic options, which handle loud breaths better (discover more in this article about handling breathing noises in 2026).
Optimize Your Environment for Better Sound
Control room acoustics by reducing echoes and background noise, much like tuning a musical instrument. Soft furnishings, rugs, or sound booths absorb reflections. I once set up in a bare room, and my voice sounded hollow and echoey. Adding a fluffy mic stand and some blankets transformed the space into a studio-like environment. For even better results, check out tips on fixing room echo and background noise in 2026, which detail essential room treatment strategies. Remember, even perfect mic placement can be undermined by a noisy room, so creating a recording-friendly space is crucial for crystal-clear audio.
Many creators believe that picking a microphone type—be it XLR or USB—is straightforward, but the reality is much more nuanced. The common misconception is that USB microphones are inherently inferior because they’re seen as plug-and-play devices, while XLR mics are labeled professional but complicated. In my experience, this oversimplification ignores critical differences in quality, compatibility, and setup requirements. For example, a high-end USB microphone like the [2026 models](https://microphones.creatorsetupguide.com/3-usb-microphones-for-2026-that-record-directly-to-sd-cards) can outperform budget XLRs when paired with the right software and environment. The real mistake many make is assuming that all USB mics can’t handle loud vocals or that XLRs always deliver better quality without considering proper gain staging. Additionally, a common trap is neglecting the importance of preamp quality and room acoustics, which can make a significant difference regardless of microphone type. Advanced users focus on details like impedance matching, interference shielding, and the synergy between microphones and audio interfaces, which are often overlooked by beginners. Peer-reviewed studies, such as those from audio engineering experts, show that signal chain quality—more than the microphone’s inherent type—dictates final sound clarity. Dive deeper into these subtleties by checking out this detailed guide on [fixing muddy sounds in your recordings](https://microphones.creatorsetupguide.com/why-your-2026-voice-recording-sounds-muddy-5-fast-fixes) and understand why experience often trumps equipment labels. Have you ever fallen into this trap? Let me know in the comments! An essential nuance is recognizing that many issues attributed to microphone type can actually stem from setup flaws or environmental factors. For instance, room acoustics or improper gain staging can cause heavy breathing or muffled vocals, regardless of whether you use an XLR or USB mic. Also, some creators overlook the impact of cabling and interference—proper shielding and grounding are vital, especially with XLR connections, which can pick up hums if not correctly installed. Keep in mind, the future of voice recording in 2026 involves understanding how dynamic microphones can handle challenging environments—check out the [best dynamic XLR mics](https://microphones.creatorsetupguide.com/7-dynamic-mics-that-actually-handle-2026-home-office-echo) designed for noise-heavy spaces. Mastering these nuanced differences ensures you’re not just relying on equipment labels but making strategic decisions for your specific use case. So, when selecting your microphone setup, remember that the devil is in the details. Don’t just buy based on brand or type—invest time in learning these advanced nuances for a truly professional sound.
Essential Tools for Long-Term Microphone Performance
Investing in quality equipment is just the beginning; maintaining it over time ensures consistent sound quality. I personally swear by regularly checking and calibrating my audio interfaces and microphones using dedicated tools like Room EQ Wizard (REW). This free software allows precise measurement of room acoustics and helps identify issues like frequency peaks or dips that cause muddiness or boxiness. Regularly running calibration tests helps me spot changes in microphone performance early before they impact recordings.
In addition, replacing worn-out cables with shielded XLR cables ensures interference-free connections, preventing subtle hums or static that degrade audio clarity over time. It’s a mistake to overlook cable quality, especially in complex setups where multiple devices are daisy-chained.
Why Using the Right Software is Critical
Effective post-processing with tools like ReaFIR from ReaPlugs can dramatically extend the life of your recordings by removing background noise or uneven frequencies. I routinely run filters and subtle EQ adjustments during editing to keep my voice crisp and clear, even if my mic setup isn’t perfect every session. Funding regular software updates and plugins is a small price for sustained professional sound quality.
How do I maintain my microphone setup over time?
Creating a maintenance routine is vital. This includes cleaning your mic capsules with gentle compressed air, regularly testing and adjusting gain settings to prevent clipping, and inspecting all cables and connectors. Also, keep your equipment in a controlled environment—avoiding humidity and temperature extremes prolongs their lifespan. Scheduling quarterly checks and calibrations keeps my setup performing at peak levels, helping me avoid costly replacements and ensuring consistent audio quality.
Scaling Your Microphone System as You Grow
When your channel or podcast expands, your mic setup needs to evolve. Switching to higher-quality XLR microphones with integrated compression can support increased volume levels and reduce the need for post-processing. Moreover, investing in an audio interface with multiple channels and high-gain preamps allows simultaneous recording of multiple hosts or guests while maintaining pristine sound quality. As I predict, future-proofing this gear by integrating digital mixers with network capabilities will streamline large-scale productions in the coming years.
The Importance of Proper Maintenance for Long-Term Results
Remember, consistent upkeep doesn’t just preserve your equipment—it enhances your overall production quality. Regularly cleaning connectors, updating firmware on audio hardware, and validating the integrity of your cabling help prevent unexpected failures or performance dips. For dedicated advice, see how expert audio engineers maintain their tools, like the detailed tips in this comprehensive guide to eliminating background noise.
Pro tip: I recommend trying the tip of calibrating your mic using REW every six months. This proactive approach keeps your sound consistent and saves you from major fixes down the line. As the trend shifts toward automated, software-driven mic calibration, investing in smart, adaptive tools now will make your long-term setup more reliable and scalable.
Lessons I Wish Someone Told Me About Microphone Placement
Early in my journey, I underestimated the power of mic positioning, which led to muffled vocals and distracting breathing noises. Discovering the off-axis placement transformed my recordings overnight, proving that small adjustments have massive impacts. The real game-changer was learning to position my mic at the correct angle and height, avoiding common pitfalls many overlook.
Another lesson was that proximity is everything. Bringing the mic closer when speaking loudly and backing off during softer moments kept my voice balanced and natural. I realized that consistent distance not only improves tone but also minimizes background noise, making editing much easier. It was then I understood that mic placement is an art worth mastering for professional results.
Resources That Made Me a Better Voice Creator
- Room EQ Wizard (REW): This free software allowed me to analyze my room acoustics precisely. Knowing where the peaks and dips in my room’s frequency response were helped me treat the space effectively. It’s a must-have for anyone serious about high-quality voice recordings.
- Shielded XLR Cables: Upgrading to high-quality, shielded cables eliminated interference and static. Trust me, stable connections make a noticeable difference, especially over longer sessions.
- ReaFIR from ReaPlugs: For post-processing, this plugin became essential to remove background hums and clean up the audio. It saved many recordings from sounding muddy and dull.
- Acoustic Treatment Guides: The detailed tutorials on soundproofing and room treatment helped me create a more controlled environment, which is crucial for crystal-clear recordings.
Keep Moving Forward and Perfect Your Voice in 2026
Your voice is a powerful tool, and with intentional adjustments, you can unlock its full potential. Remember, every small tweak in mic placement, environment, and tools adds up to a professional sound. Embrace the process, stay curious, and don’t hesitate to experiment—your audience will notice the difference. Keep pushing your boundaries and making art with every recording session.
What’s the biggest challenge you’ve faced with microphone placement or environment? Share your experience below—I’d love to hear your story and help you overcome it.