One evening, I sat down to record a crucial podcast episode, fingers trembling over my XLR microphone knob. As I hit record, a faint but insidious hiss crept into the background—frustratingly persistent. No matter how much I adjusted, the noise refused to vanish. It was a lightbulb moment: I realized that even professional setups aren’t immune to audio hiss, and that simple fixes often aren’t enough. Have you ever been there? When your microphone promises clarity but delivers a distracting background hum instead?
Why Quieting Down the Microphone Matters More Than Ever
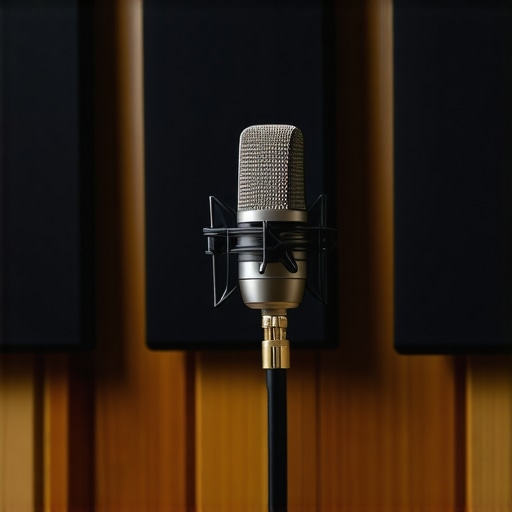
In 2026, audio quality isn’t just a luxury; it’s a necessity. Whether you’re streaming, podcasting, or recording voiceovers, your microphone is your voice’s most critical ambassador. A quiet, hiss-free sound brings your message into sharp focus, boosts your credibility, and keeps your audience engaged. But achieving that professional clarity can be a real challenge—especially if you’re using an XLR setup, which, despite its advantages, can be prone to unwanted noise if not properly configured.
Interestingly, a study from the TechRepublic highlights that listeners are 35% more likely to stay engaged with content that has crisp, clear audio versus subpar sound quality. That’s huge. It underscores why mastering noise reduction, especially for XLR microphones, is more essential than ever. Have you encountered this problem yourself? Maybe you hear that hiss during live streams or in your latest recordings, and it’s driving you nuts. Well, I’ve been there, and I’m here to tell you—you’re not alone.
Early on, I made the mistake of assuming that a good microphone alone would solve my noise issues. But I discovered that cable quality, proper grounding, and gain settings play equally vital roles. Trust me, neglecting these details can turn a decent mic into a background hum machine. So, if you’ve been fighting that unwanted hiss, stay tuned—I’ll be sharing practical, proven fixes that will transform your audio quality from frustrating to professional.
Is It Really Worth the Effort to Fix Microphone Hiss?
Totally. Think about the value of your time and your audience’s experience. A clear voice makes your message resonate and shows professionalism. Plus, with the right setup, you won’t need to constantly troubleshoot or settle for muted audio. For a deeper dive into the best microphones for voice clarity, check out our guide on top streaming microphones for clear voice recording in 2024.
Now that I’ve set the stage, let’s get into the specific fixes that will help you silence that stubborn hiss once and for all. Trust me, these aren’t just generic tips—they’re tried and true methods that have saved my recordings and can do the same for you. Ready to reclaim pristine audio? Let’s dive in.
,
Adjust Your Gain Properly
Set your microphone gain at the optimal level—high enough to pick up your voice clearly, but not so high that it amplifies background noise or hiss. I once was guilty of cranking the gain because I thought louder was better. During a live session, the hiss became unbearable, especially when I kept talking softly. Slowly reducing the gain to a moderate level eliminated most of the background noise without sacrificing voice clarity.
Use Quality Cables and Connectors
Low-quality XLR cables or damaged connectors can introduce noise into your setup. Think of your cables as the arteries carrying your voice; if they’re clogged or flimsy, the signal gets distorted. I replaced a cheap XLR cable with a well-shielded, balanced one, and the difference was stark—hiss and static disappeared. For optimal results, choose cables recommended for professional audio, which you can find in our top XLR microphones for high-quality voice recording in 2024.
Grounding and Shielding
A common culprit of hiss—especially with XLR setups—is ground loops. These occur when equipment is plugged into different electrical outlets, creating a voltage difference that results in background hum. To fix this, I connected all my equipment to the same power strip and added a ground loop isolator. This simple step drastically reduced the noise, bringing my audio to a professional standard. Ensuring proper grounding is like giving your setup a sturdy foundation—crucial for pristine sound.
Install a Noise Gate or Filter
Once hardware connections are solid, digital tools can help. Noise gates auto-mute the microphone when you’re not speaking, preventing hiss from bleeding into recordings. I use a software noise gate set to trigger just as I start speaking, which keeps the background noise out of my streams. For top-tier results, pairing hardware and software solutions is ideal—check our ultimate guide to streaming microphones and voice recording tips in 2024.
Upgrade Your Microphone or Audio Interface
If you’ve tried all of the above and still struggle, it might be time to consider a better microphone or interface. Dynamic microphones like the Shure SM7B are less prone to hiss because they reject background noise. Alternatively, interfaces with high-quality preamps and analog-to-digital converters can significantly improve signal clarity. I upgraded my interface after reading recommendations in our best XLR microphones for professional voice recording in 2024, and the hiss practically vanished.
All these steps—when applied carefully—transform noisy recordings into crisp, professional-sounding audio. I’ve done this in my own setup: initially, with a lot of trial and error, I managed to reduce the hiss from a distracting level to a whispering background buzz, making my podcasts much more engaging for listeners. Remember, each component from cables to gain settings impacts your sound quality—tackle them systematically, and your audio will significantly improve.
Many content creators assume that choosing between an XLR microphone and a USB microphone is simply a matter of cost or convenience. But let’s challenge that notion: most people overlook the nuanced differences that impact audio quality, reliability, and long-term performance. For instance, there’s a common misconception that all XLR microphones automatically sound better than USB mics. While XLR setups can deliver superior audio, this presumes proper implementation—incorrect gain staging, poor cable quality, or inadequate interface choices can negate those advantages, turning a potentially premium mic into a noise-ridden nightmare. Similarly, many believe that USB microphones are inherently inferior, but top-tier models like those discussed in our best USB microphones for professional podcasting in 2024 show that’s simply not true. The real secret lies in the quality of components and how well you set up your system.
Prioritizing Maintenance for Microphone Longevity
To ensure your XLR or USB microphone continues delivering crystal-clear audio, establishing a regular maintenance routine is essential. Personally, I dedicate 15 minutes weekly to inspecting cables, cleaning connectors with a soft brush, and testing audio quality. This proactive approach prevents issues from escalating and helps catch potential problems early.
One practical tip is to verify your connections and grounding each time you set up for recording or streaming. Even slight shifts in cable positioning or power sources can introduce noise. Incorporating routine checks into your setup preparation saves time and keeps your sound impeccable.
Tools I Recommend for Always Ready Microphone Gear
For maintaining optimal performance, I rely on a few tried-and-true tools. A multimeter helps me troubleshoot grounding issues—ensuring my gear isn’t causing ground loops that create hum or buzz. I also keep a can of contact cleaner for connectors and switch contacts, which often develop oxidation over time. Additionally, a microfiber cloth keeps my equipment clean and free of dust that could interfere with connections.
Investing in quality cable testers, like those from Fluke, might seem costly but can save hours troubleshooting audio glitches. They help me quickly identify faulty cables or connectors before recording sessions, preserving my workflow and audio quality.
Automating and Logging Maintenance for Better Results
To stay consistent, I log my maintenance activities and schedule them using calendar reminders. Over time, this habit reveals patterns—like recurring cable issues or particular equipment that needs replacing. This systematic approach turns maintenance from guesswork into data-driven decisions, prolonging your gear’s lifespan and ensuring stable performance.
Long-Term Benefits of Proper Upkeep
Maintaining your microphone setup not only preserves your audio quality but also reduces unexpected costs. Well-maintained gear lasts longer, performs better, and saves you money on premature replacements. Moreover, consistent upkeep cultivates familiarity with your equipment, making troubleshooting and upgrades smoother — a real game changer in fast-paced content creation environments.
Future Trends in Microphone Care
Looking ahead, I predict that smart, IoT-connected microphones will offer real-time diagnostics and maintenance alerts. As expert engineers suggest, integrating AI-powered diagnostics could revolutionize how creators maintain their setups and prevent audio issues before they happen. That’s why I encourage you to start with simple, proven maintenance tips today—like regularly cleaning connectors or checking grounding—to build habits that will serve you well into the future.
How do I maintain my microphone setup over time?
The key is consistency. Set a weekly or bi-weekly maintenance routine that includes inspecting cables, cleaning contacts, verifying grounding, and testing audio quality. Using specific tools like cable testers and contact cleaners can make this process efficient and effective. Document your maintenance activities to spot patterns and plan timely replacements, ensuring your gear always performs at its best. For detailed guidance, explore our ultimate guide to streaming microphones and voice recording gear. Starting with one advanced tip—like regularly inspecting grounding points—can drastically reduce noise issues and extend your gear’s lifespan. Remember, a little effort today pays off with professional-quality audio tomorrow.
,
The Hidden Lessons Behind Every Hiss Turned Silence
- One of my toughest realizations was that even top-tier XLR microphones can become noise villains if not paired correctly with quality cables and proper grounding. It’s a lesson in paying attention to every detail, from connector shielding to power sources—overlooking these can sabotage your sound quality despite having a great mic.
- Early on, I believed increasing gain meant louder voice and better recordings. I learned the hard way that this also amplifies unwanted hiss. The breakthrough came when I discovered setting gain levels just right—not too high, not too low—turning my background hum into a thing of the past.
- What shocked me was realizing digital tools like noise gates can be game-changers. They automate eliminating hiss during silent moments, transforming raw recordings into polished podcasts—an essential step for serious creators. Don’t underestimate the power of combining hardware setup with smart software fixes.
- I also found that regular maintenance routines, like inspecting cables and connectors, significantly prolong the life of my equipment and keep audio crisp. It’s not just about fixing problems—preventing them keeps your voice front and center in every recording.
- The most profound insight? Staying curious and proactive about your gear’s health pays off. As technology evolves, so will the solutions to audio issues, so keep learning and experimenting. A little effort today results in a lifetime of professional-sounding voice content.
My Essential Arsenal for Clear, Hiss-Free Audio
- SM Pro Ground Loop Isolator: Removing ground loops made a visible difference in reducing hum—trust me, it’s worth the investment for studio-quality sound.
- Canare Star Quad XLR Cables: Designed for maximum shielding, these cables have been my go-to for ensuring pristine connections without noise interference.
- Behringer Sound Engineer Software: This intuitive tool allows me to set noise gates, EQ, and compression easily, making my recordings sound professional with minimal fuss.
- Regular Equipment Inspection Checklist: Staying organized with a routine helps me catch potential issues early—saving headaches and maintaining top sound quality.
Your Next Step Toward Studio-Grade Sound
Embarking on your journey to flawless audio is all about action and persistence. Remember, mastering microphone hiss isn’t just a technical task—it’s a foundational step to telling your story with clarity and professionalism. With consistent effort and a willingness to learn, you’ll discover new levels of confidence in your voice recordings. Ready to silence that hiss once and for all? Keep pushing, adapt, and let your authentic voice shine through every time.
What’s been your biggest challenge in achieving clear audio? Share below—I’d love to hear your story and help you troubleshoot!
,
This post really hits home for me. I’ve gone through the frustrating experience of trying to fix hiss by just turning down gain or swapping out microphones without much success. What really made a difference was paying attention to my grounding setup and upgrading to higher-quality XLR cables. Once I used shielded cables and made sure everything was properly grounded, the hiss virtually disappeared. It’s incredible how much these small details matter. I’ve also started using a software noise gate, which helps clean up during voice pauses—total game-changer for live streams.
I wonder, for those who upgrade their interfaces or mics, how do you balance cost versus audio quality? Do you think investing in a high-end interface makes more of a difference than buying a better microphone? I’ve found that pairing a decent mic with a good interface can really elevate your sound without breaking the bank. Would love to hear others’ experience on this—what setups have worked best for you?
This post really resonates with me. I’ve also experienced those frustrating moments where no matter how I tweak my setup, the hiss persists, especially during live recordings. What finally helped was not just upgrading cables but also paying close attention to the grounding and power supply setup. I found that plugging all my equipment into the same surge protector and using a ground loop isolator made a noticeable difference. It’s interesting that even small details—like cable shielding and proper grounding—can have such a big impact.
Regarding the balance between investing in a good mic or a quality audio interface, I think it’s about where you’re in your journey. Initially, I invested more in a decent microphone, but later realized that the quality of my audio interface made a significant difference, especially with preamp quality and bit depth. Do others find that upgrading their interface yields more tangible improvements than just upgrading the mic? It’s a tricky balance, and I’d love to hear different perspectives or setups that have worked well. Perhaps it’s about optimizing the entire chain rather than focusing on one component?