I remember the exact moment I realized my microphone was sabotaging my podcast success. It was late at night, and I was trying to record a special episode. My voice sounded distant, muffled, and just plain bad. I spent hours editing, trying to clean up the noise, only to realize that my equipment was holding me back. That lightbulb moment made me understand something crucial: choosing the right microphone isn’t just about fancy features; it’s about ensuring your voice comes through crystal clear to your audience.
Why Good Microphone Quality Matters More Than Ever
In 2024, the competition for attention in the podcasting and streaming world is fiercer than ever. Listeners have high expectations for sound quality, and frankly, they won’t tolerate poor audio. According to a recent study by Neil Patel, 60% of podcast listeners will abandon an episode if the audio quality is subpar. That’s a huge chunk of your potential audience lost just because of bad sound. So, it’s clear—your microphone isn’t just gear; it’s your voice’s best friend or worst enemy. Luckily, I’ve been through the trial and error, and I can guide you toward the top picks for 2024, whether you’re streaming, recording, or broadcasting live.
Is Investing in a High-End Microphone Really Worth It?
Early on, I made the mistake of assuming that a cheap mic would do the job. Spoiler: It doesn’t. I wasted hours editing background noise, battling inconsistent sound levels, and convincing myself that I could fix everything in post-production. The truth is, a good microphone saves you time and frustration, and it makes your voice sound professional from the start. Want to see what the experts recommend? Check out the best microphones for voice recording and streaming in 2024. It’s a curated list based on real-world testing and user reviews—trust me, this makes a difference.
So, are you facing the same problem I did? Struggling to get your voice heard clearly? Don’t worry. I’ll walk you through the top microphone options that can upgrade your audio quality without breaking the bank. Because let’s face it—your voice deserves to be heard in all its clarity, and your audience will thank you for it.
Choose Your Microphone Type Wisely
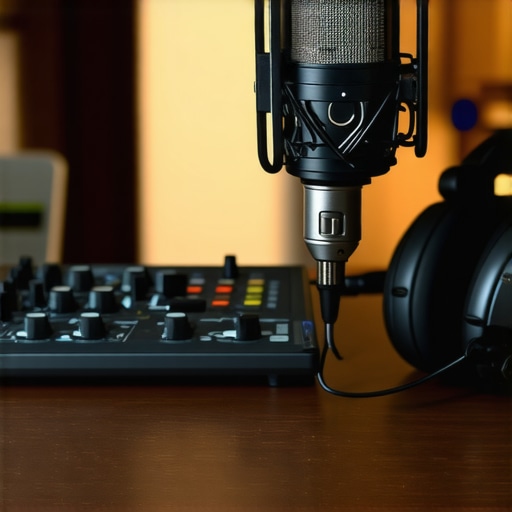
Start by understanding the core differences between USB and XLR microphones. USB mics are plug-and-play, perfect for beginners or those with limited setup space. XLR mics, on the other hand, deliver higher audio quality and are expandable for professional setups. I once tested a popular USB mic for my first live stream, but soon realized that upgrading to an XLR with a dedicated audio interface significantly improved my audio clarity. Check out the complete guide to microphone types for deeper insights.
Focus on Quality Over Cost
Investing in a quality microphone pays off in the long run. When I chose my first XLR mic, I looked beyond price and examined reviews focusing on voice clarity, noise rejection, and durability. A good microphone captures your voice’s nuances, making your audience feel engaged. For example, I swapped out a budget mic for the best XLR microphone for voice, and the difference was night and day.
Optimize Your Setup for Best Sound
Placement matters more than you think. Position your mic about 6-12 inches from your mouth, slightly off-axis to reduce plosive sounds. Use a pop filter to minimize harsh bursts of air, which can distort your audio. I remember struggling with sibilance until I added a pop filter, transforming my recordings instantly. Don’t forget to record in a quiet environment and use acoustic treatment if possible. It’s worth the effort, as it prevents background noise from ruining your audio quality. Check out the microphone placement tips for more.
Test and Fine-Tune Before Going Live
Always run a test recording before your main session. Listen critically and adjust your mic position, gain, and environment. When I prepared for a big podcast episode, I spent 30 minutes tweaking my setup, which saved me hours of post-production editing. Use headphones during recordings to catch issues in real time. This step helps you catch accidental noises, misplaced mics, or gain issues that could compromise sound quality. Remember, consistent testing ensures you sound professional every time.
Upgrade Accessories for Better Clarity
Small accessories make a big difference. A high-quality pop filter, shock mount, and a good microphone stand can significantly reduce unwanted vibrations and noise. I swapped my basic stand for a boom arm, which minimized desk noise and improved my recording consistency. These investments are small but impactful, helping you maintain clear and consistent audio quality. For top accessory picks, visit the accessory recommendations.
Many podcasters and streamers fall into misconceptions about microphones, which can significantly hinder their audio quality. Let’s clear up some of the most pervasive myths and reveal the nuances that can make or break your setup.
Why the Most Popular Microphone Isn’t Always the Best Choice
Everyone recommends a certain microphone because it’s trendy or highly rated, but that doesn’t mean it’s suitable for your specific environment or voice. For instance, a versatile condenser mic might work wonders in a controlled studio but pick up every background noise in a noisy room, leading to frustration. The secret lies in understanding your needs and environment better. Sometimes, choosing a dynamic microphone with higher noise rejection could be a smarter move—especially if you record in a less-than-ideal acoustic space. For an in-depth comparison, check out the comprehensive guide to microphone types.
Beware of the ‘One-Size-Fits-All’ Approach
Many believe that once they buy a good mic, their sound is set for life. But the reality is, microphone placement, environment, and even your voice’s tone play pivotal roles. A common mistake is neglecting proper positioning; even a top-tier mic will sound terrible if placed too far away or off-axis. Additionally, overlooking acoustic treatment can cause echoes, reverb, or background noise to creep into your recordings. It’s not just about the gear; it’s about how you use it. Remember, regular testing and fine-tuning are essential to optimize your sound. Want to avoid costly mistakes? Explore the best microphone placement tips.
Advanced Question: How Do I Correctly Balance Gain and Proximity for Professional Sound?
Many advanced users struggle with getting the perfect gain setting and proximity effect. Setting gain too high can result in distorted audio, while too low makes your voice inaudible or thin. The key is to find a sweet spot where your voice sounds full but without clipping. As a rule of thumb, position the mic about 6-12 inches from your mouth and speak at a natural volume. Adjust the gain so that your peaks stay within the optimal range (usually around -12dB to -6dB). Using a pop filter and a shock mount also helps maintain clarity by reducing plosives and vibrations. For detailed techniques, I recommend checking out the ultimate guide to professional mic setup.
And remember, investing in the right accessories—like a quality pop filter and proper microphone stand—can drastically improve your sound clarity. Don’t fall into the trap of thinking gear alone will save poor technique. Regular testing and adjustments are your best tools for a polished, professional sound. Have you ever fallen into this trap? Let me know in the comments!
Maintaining your microphone setup over time is crucial to ensure consistent, professional audio quality. From cleaning connectors to updating firmware, a few strategic tools and habits can extend the lifespan of your equipment and keep your sound crisp. I personally rely on a combination of specialized cleaning kits, software updates, and routine checks to keep my gear functioning at peak performance. Regularly inspecting and maintaining your microphone components not only prevents unexpected breakdowns but also helps you deliver clear, professional recordings every time.
How do I keep my microphone gear working smoothly over the long haul?
Firstly, investing in high-quality cleaning tools is essential. I recommend a dedicated microphone cleaning kit that includes a small brush, compressed air, and cleaning solution designed specifically for delicate electronics. These help remove dust, saliva, and dirt from the grille and internal components without damaging sensitive parts. For XLR connectors, a contact cleaner like DeoxIT is invaluable for preventing corrosion and ensuring a strong connection. Regular cleaning—once every few months—can prevent buildup that degrades sound quality.
Secondly, software and firmware updates are often overlooked but are vital. Many professional microphones and audio interfaces come with firmware that improves stability and adds features over time. Checking the manufacturer’s website periodically to download the latest updates can fix bugs and enhance performance. I personally set a reminder every quarter to verify my gear’s firmware status. This proactive approach saves me from troubleshooting issues during critical recordings.
Third, routine testing is your best friend. Before recording, I always run a quick test to ensure all connections are secure, the gain is properly set, and there’s no unwanted noise. Using audio editing software like the recommended tools, I can quickly identify and address any issues. This habit ensures that my microphone remains reliable, and I avoid surprises during live sessions or important recordings.
Lastly, consider investing in durable accessories. A shock mount can prevent vibrations from desk movements, and a pop filter not only improves sound but also protects the mic capsule. These small additions can significantly extend your gear’s lifespan and maintain audio clarity over time.
Looking ahead, I believe the trend in microphone maintenance will increasingly incorporate smarter diagnostic tools. Imagine a future where your microphone can alert you via app when it needs cleaning or firmware updates—saving you time and preventing issues before they arise. For now, adopting a routine of regular cleaning, updates, and testing will keep your setup performing at its best.
Don’t underestimate the power of routine maintenance. Try integrating a quick quarterly check with your setup, and you’ll notice your audio quality remains consistently professional. Keep your gear in top shape, and your audience will always hear the best you have to offer.
The Hardest Lesson I Learned About Microphone Mastery
One of my biggest realizations was that even the most expensive microphone won’t help if it’s not set up correctly. I spent months chasing top gear before understanding that placement, environment, and technique matter more than price tags. The lightbulb moment was when I finally saw how proper positioning and acoustic treatment transformed my sound instantly.
3 Myths About Microphones That Held Me Back
Early on, I believed that a high-end condenser mic was always the best choice, regardless of environment. Turns out, dynamic microphones with good noise rejection are better for noisy spaces. Also, I thought that once I bought a good mic, I didn’t need to worry about regular maintenance or testing. Now I know that consistent testing and maintenance are key to professional sound.
What Experts Won’t Tell You About Microphone Setup
Most professionals will tell you the gear isn’t everything, but they often overlook the importance of fine-tuning gain and proximity. Finding that sweet spot between too close and too far is an art that dramatically affects clarity. Plus, the importance of accessories like pop filters and shock mounts is sometimes underestimated, but they are game-changers for quality.
My Essential Toolkit for Podcast Sound Quality
I rely on a few trusted tools: a dedicated cleaning kit to keep connectors pristine, regular firmware updates from manufacturers, and a calibration app for gain and acoustics. These help me maintain consistent quality without surprises. For top microphone picks, I recommend exploring the best microphones for voice recording and streaming in 2024.
Keep Your Voice Clear and Your Audience Engaged
Your microphone isn’t just gear—it’s your voice’s best friend. Investing in the right setup, regular maintenance, and proper technique will dramatically improve your recordings. Remember, a clear voice is your most powerful tool in building trust and connection with your audience. Don’t let poor audio hold you back from sharing your message. Your voice deserves to be heard in all its clarity—so get started today!
Reading this post really resonated with my own experience early in my podcasting journey. I used a budget microphone at first, thinking it would be enough, but I kept battling background noise and inconsistent sound levels. Upgrading to a good XLR microphone with proper acoustic treatment made a noticeable difference in clarity and professionalism. It’s surprising how much environment and setup can affect your sound, even with the best gear. I also learned to do regular tests and adjustments, which saved me a lot of time editing later. Have others found that investing in quality accessories, like a shock mount or pop filter, significantly improves the sound? I believe these small but crucial upgrades often get overlooked, yet they can be game-changers for achieving that crisp, clear voice that keeps your audience engaged. Would love to hear more about fellow podcasters’ tips on optimizing their setup for the best possible audio quality!
This post hits the mark—getting the right mic can genuinely transform your podcast’s sound quality. I remember starting out with a budget condenser mic that picked up every background noise, which made editing a nightmare. Transitioning to a quality XLR microphone, along with some acoustic treatment in my recording space, really elevated my audio. It’s surprising how much environment influences clarity; even small things like proper mic placement or using a pop filter can make a big difference. I found that investing in a good shock mount also helped reduce desk vibrations, leading to cleaner recordings.
One thing I’ve noticed is that even with excellent gear, consistent testing and placement adjustments are crucial. Do others find that regular tweaks—like adjusting gain or positioning—are the key to maintaining professional sound over time? I’d love to hear more about how fellow podcasters manage their setup and what accessories they consider indispensable. Sometimes, the smallest upgrades can have the biggest impact on listener experience, which ultimately keeps the audience engaged and coming back.