Ever sat down to record your podcast or stream, only to realize that your voice sounds flat, distant, or just plain weird? I’ve been there. That frustrating moment when I thought I had the perfect setup, only to hear my voice back and cringe. It’s a lightbulb moment that hits hard—your gear might be the culprit, but fixing it isn’t as complicated as you think. Today, I’ll share how I cracked the code for clear, professional-quality voice recordings and how you can do the same.
Why Getting Your Microphone Right Changes Everything
When I first started, I spent hours fiddling with software, trying to fix poor audio quality. Turns out, the biggest leap in sound clarity came from choosing the right microphone. It’s like switching from a plastic toy to a real instrument—suddenly, everything sounds richer, warmer, and more engaging. According to industry expert reviews, investing in the right microphone can improve your voice quality more than any fancy editing software (source: Creator Setup Guide). But with so many options, where do you start? That’s what we’re here to figure out.
Is Microphone Choice Actually Worth the Hype?
Early on, I made a mistake that many beginners do: I bought a fancy condenser mic without considering my environment or voice style. The result? Echoes, background noise, and a sound that didn’t match my energy. It wasn’t until I realized that mic placement, room acoustics, and matching gear to my voice mattered more than the brand name that I saw real improvement. If you’ve ever wondered whether investing in top-tier gear truly pays off, I’ll help you cut through the hype and find what’s best for your needs. Want to skip the guesswork? Check out our curated picks of best microphones for streaming and podcasting in 2024.
So, if you’ve faced the frustration of poor audio quality or simply want to elevate your voice game, you’re in the right place. We’ll explore the different types of microphones, what features matter most, and practical tips to get your voice sounding its best. Ready to transform your sound from mediocre to professional? Let’s dive in!
Choose the Right Microphone for Your Voice
Start by selecting a microphone suited to your voice and environment. I once tried a high-end condenser without considering my room acoustics, which led to echo and background noise. Instead, I recommend checking out our curated list of best microphones for streaming and podcasting in 2024. For beginners, USB mics like the Blue Yeti are easy to set up, while XLR mics like the Rode Broadcaster offer more professional sound if you’re ready to invest in an audio interface.
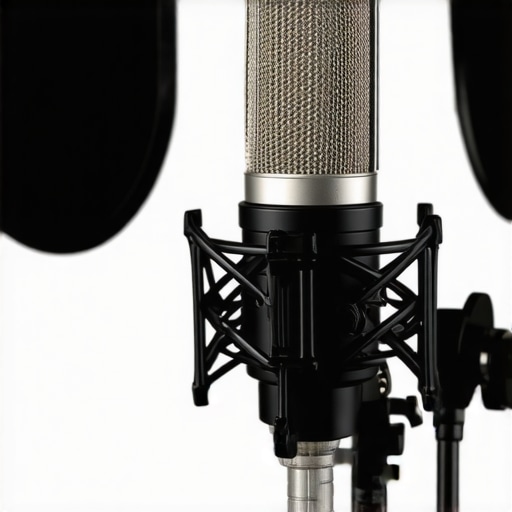
Position Your Microphone Correctly
Proper placement is critical. Think of your microphone as a musical instrument—distance and angle matter. Place the mic about 6-12 inches from your mouth, slightly off-axis to reduce plosives. Use a pop filter or foam windscreen to soften harsh sounds. I once used a pop filter ineffectively until I realized it should be positioned just a few inches from the mic, not on the mic itself, which dramatically improved clarity.
Optimize Your Recording Environment
Room acoustics can make or break your audio. Aim for a space with soft furnishings, carpets, and curtains to absorb echo. When I recorded in my small office, I added blankets and foam panels, which made a noticeable difference. For the best results, consider investing in acoustic treatment like bass traps or diffusers. If you want detailed guidance, check out our overview of the top microphone types for streaming and voice recording.
Adjust Your Microphone Settings
Set your gain properly—too high causes distortion, too low results in weak audio. Start with a low gain and gradually increase until your voice is clear without clipping. Use software or hardware sliders to fine-tune. I once ignored this step, resulting in a noisy, muffled sound until I learned to monitor my input levels carefully. For professional setups, consider using a compressor to even out your voice dynamics, which you can learn more about in our ultimate guide to top USB and XLR microphones.
Test and Tweak Until Perfect
Always test your setup before recording or streaming. Record a short clip and listen critically. Adjust mic position, gain, and environment as needed. I spent an afternoon tweaking my mic placement, and after several tests, I achieved a crisp, warm sound that made my audience notice the difference. Remember, small adjustments can have a big impact—don’t settle until your voice sounds natural and clear.
Many beginners and even seasoned creators fall prey to misconceptions about microphones that can hinder their audio quality. Let’s dig deeper into the nuances that are often misunderstood, so you can avoid costly mistakes and get the best sound possible.
Myth: The More Expensive Microphone Always Sounds Better
It’s tempting to believe that a high price tag guarantees stellar audio, but the truth is more nuanced. An expensive microphone might have features you don’t need or might require a professional setup to shine. For instance, some high-end condensers excel in controlled studio environments but struggle with untreated rooms, leading to echo and background noise. Conversely, a well-chosen budget microphone paired with proper placement and acoustic treatment can outperform a pricier model in a less-than-ideal space. Industry experts emphasize that matching a mic to your environment and voice is more impactful than simply chasing the latest high-end gear. Check out our curated list of best microphones for streaming and podcasting in 2024 for balanced options.
Overlooked Trap: Ignoring Room Acoustics
Many creators focus solely on microphone selection, neglecting their environment. A common mistake is thinking that a good mic can fix poor room acoustics, but this often backfires. Echoes, background noise, and reflections can make even the most expensive mic sound muddy or distant. The solution involves strategic placement and acoustic treatment—think blankets, foam panels, or even bookshelves—to absorb and diffuse sound waves. I learned this the hard way when my high-end condenser sounded terrible in my cluttered office, but after adding some DIY acoustic panels, my voice became much clearer. For advanced tips, explore our expert guide to top microphone types.
Why Microphone Placement Matters More Than You Think
Proper positioning is often underestimated. Placing your mic too close can cause harsh plosives, while too far results in weak audio. The sweet spot is generally 6-12 inches from your mouth, slightly off-axis. Using a pop filter helps reduce harsh sounds without affecting volume. A common mistake is to leave the mic on a desk or stand without adjusting its angle or distance. Small tweaks here can significantly enhance clarity, warmth, and presence. It’s a step many overlook, but it pays off in professional-sounding recordings.
Have you ever fallen into this trap? Let me know in the comments. Remember, mastering your microphone setup is about more than just gear—it’s about understanding the nuances that make your voice stand out. For more detailed advice, browse our ultimate guide to top microphones.
Once you’ve invested in quality microphones and set up your ideal recording environment, the next critical step is maintaining your gear to ensure consistent, professional sound quality over time. Proper upkeep not only extends the lifespan of your equipment but also prevents unexpected issues during crucial recording sessions. Today, I’ll share the tools and methods I personally rely on to keep my podcasting setup running smoothly, along with insights into future trends in gear maintenance.
How do I maintain my microphone and gear over time?
Regular cleaning is fundamental. I use a soft, lint-free cloth to wipe down my microphones and stands after each session, removing dust and fingerprints that can affect sound quality. For delicate parts like the capsule, I recommend using a specialized electronics brush to gently remove dust without damaging sensitive components. To keep connectors clean, I use contact cleaner spray, which prevents corrosion and ensures reliable connections. When I notice a drop in audio quality, I check the cables and interfaces first—often, a quick swap or cleaning restores perfect sound.
Investing in a good dehumidifier for my recording space has been a game changer. Humidity accelerates corrosion on metal parts and can lead to mold, especially in less controlled environments. Keeping the room dry preserves both the equipment and your voice quality. Additionally, I rely on an ultrasonic cleaner for my XLR connectors once a year—it’s a surprisingly effective way to remove grime that can cause connectivity issues.
To safeguard against sudden power surges, I use a high-quality surge protector and a UPS (Uninterruptible Power Supply). This setup ensures my gear stays protected and maintains power stability during outages, preventing data loss or hardware damage. For routine software updates—especially for audio interfaces and recording software—I set calendar reminders. Staying current with firmware and drivers is crucial, as manufacturers often optimize performance and fix bugs with each update.
Looking ahead, I believe AI-driven diagnostic tools will become standard in the industry. These tools could automatically detect issues like microphone drift, cable faults, or interference, and suggest solutions in real-time. As technology advances, maintaining your gear will become more automated and less time-consuming, allowing creators like us to focus more on content and less on technical hiccups.
Try this advanced tip to ensure your setup stays pristine
One of my favorite practices is using a silica gel dehumidifier packet inside my equipment storage case. This simple addition absorbs moisture and prevents corrosion even in humid climates. It’s a small investment with a big payoff—your gear stays dry, clean, and ready for action. Incorporate this tip into your routine, and you’ll notice fewer maintenance issues over time. For detailed recommendations and the exact products I use, check out our comprehensive guide to top podcasting tools.
The Hardest Lesson I Learned About Microphone Setup
One of the most eye-opening lessons I encountered was realizing that even the best microphone can sound terrible if not set up properly. I once bought a top-tier condenser mic, expecting studio-quality sound, but my recordings were filled with echoes and background noise. It wasn’t until I understood the importance of room acoustics and proper mic placement that I saw a real transformation. This taught me that gear alone isn’t enough—your environment and technique are equally critical.
Three Myths About Microphone Quality That Held Me Back
I used to believe that expensive gear always meant better sound. Turns out, a budget microphone paired with good placement and acoustic treatment can outperform pricier models in untreated rooms. The second myth was that mic position doesn’t matter—small adjustments in distance and angle can make a huge difference in clarity and warmth. Lastly, I thought software fixes could compensate for poor hardware; however, a clean, properly set-up mic reduces editing time and results in more natural recordings.
What Industry Experts Won’t Tell You About Microphone Selection
Many professionals emphasize that matching your microphone to your voice and environment beats chasing the latest technology. For example, a dynamic mic is excellent in noisy settings, while condensers excel in controlled environments. Investing in the right gear means understanding your specific needs and not just following trends. This insight helped me avoid costly mistakes and focus on what truly improves my sound quality.
My Essential Toolkit for Improving Voice Recordings
To maintain my setup, I rely on a few key tools. A soft, lint-free cloth keeps my mic and stands clean, while contact cleaner ensures reliable connections. I swear by acoustic panels and blankets to tame room echoes—these DIY solutions are affordable and effective. Additionally, a high-quality surge protector and a dehumidifier protect my gear from moisture and power surges. For detailed recommendations, I trust this comprehensive guide.
Embrace the Challenge and Elevate Your Voice
Improving your voice quality with the right microphone setup is a journey worth taking. The more you learn and experiment, the more natural and professional your recordings will sound. Remember, every small tweak—whether in placement, environment, or settings—can unlock new levels of clarity. Your voice has the power to connect, inspire, and entertain. Keep pushing forward, and don’t be afraid to try new techniques.