Ever spent hours tweaking your microphone settings, only to realize your voice still sounds off during a crucial stream or recording session? I remember countless frustrating moments early in my journey when I thought any mic would do the trick. The truth is, selecting the right microphone isn’t just about budget or brand—it’s about understanding what kind of mic best suits your voice and setup. And trust me, making the wrong choice can be a real game-changer, turning your professional aspirations into a headache.
Why Your Microphone Choice Could Make or Break Your Content
In 2024, with the explosion of content creators, having a microphone that captures your voice clearly and naturally isn’t just nice to have—it’s essential. Did you know that over 70% of viewers say poor audio quality pushes them away faster than bad video? That stat, from a recent study by WIPO, underscores why investing in the right microphone matters more than ever. But here’s the catch: with so many options—USB, XLR, condenser, dynamic—it’s easy to get overwhelmed.
Early on, I made the mistake of thinking a cheap USB mic could replace a professional setup. Spoiler: it can’t. That mistake cost me credibility and viewers. Choosing the right type of microphone can seem daunting, but that’s exactly what I want to help you with today. I’ll walk you through the most popular and effective options for streaming and voice recording, so you can make an informed decision and avoid my rookie errors.
Got this problem too? You’re not alone.
If you’ve ever felt overwhelmed by the sheer number of choices, or wondered whether a certain mic is really worth the hype, I get it. I’ve been there. But the good news? Once you understand the differences and what each mic type offers, selecting your perfect match gets a whole lot simpler. For a detailed breakdown tailored to your needs, check out my recommendations on top microphone picks for streamers and podcasters in 2024.
In the next sections, we’ll dive into the main types of microphones, their pros and cons, and which one might be the best fit for your setup. By the end, you’ll be ready to pick a mic that truly elevates your voice and makes your content stand out. Ready to get started? Let’s do this.
,
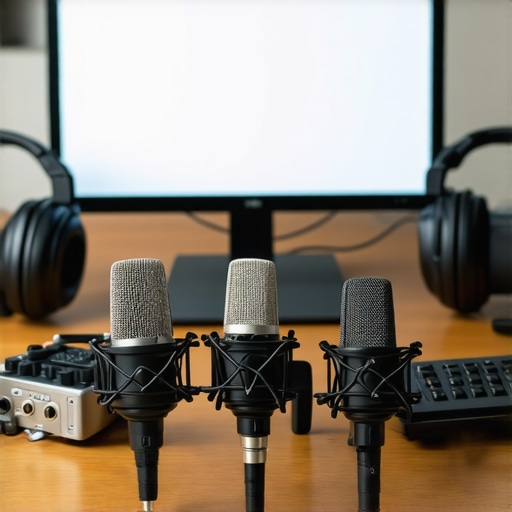
Choose the Right Microphone Type for Your Needs
Start by identifying what you primarily use your microphone for—streaming, podcasting, voiceover, or recording. Each application benefits from different mic types. For example, if you want a straightforward setup, a USB microphone offers plug-and-play convenience. If you aim for studio-quality sound, an XLR microphone paired with an audio interface provides richer audio control.
Assess Your Environment and Setup
Before purchasing, evaluate your recording environment. Is it noisy or echoey? If yes, consider dynamic microphones that reject background noise better than condensers. For quieter rooms, condenser mics capture more detail but need sound treatment. I once used a condenser mic in a noisy space, which resulted in muffled audio. Moving it closer to my mouth and adding a small sound booth improved clarity significantly.
Match Your Microphone to Your Voice
Different microphones shape your sound differently. Use a cardioid condenser for warm, natural tones or a dynamic mic for more punch and durability. I experimented with a shotgun mic once, which was overkill for my voice but excellent for capturing distant sounds in a noisy environment.
Optimize Placement and Positioning
Placement can make or break your sound. Keep the mic about 6-12 inches from your mouth, slightly off-axis to reduce plosives. Use a pop filter to minimize harsh ‘p’ and ‘b’ sounds. I learned this the hard way when I kept peeking into my mic and getting harsh pops, which I fixed by adding a pop filter and adjusting my angle.
Adjust Your Settings for Clarity
Once set up, tweak your gain, EQ, and compression. Too high gain causes distortion; too low, it sounds thin. Start with a moderate gain and adjust while speaking naturally. Use software filters to enhance clarity without making your voice sound unnatural. I once recorded a session, and after reducing gain and adding a subtle EQ boost around 3kHz, my voice sounded much clearer and professional.
Test and Refine Your Setup
Always record a test clip and listen critically. Check for background noise, pops, and clarity. Make incremental adjustments. I spent a few days fine-tuning my mic placement and settings, which resulted in a noticeable improvement in my final recordings. Remember, the key is iterative testing until your sound feels natural and polished.
Many aspiring content creators accept certain beliefs about microphones without question, but these myths can actually hinder your progress and lead to costly mistakes. Let’s dig deeper into some of the most common misconceptions and how understanding the nuances can improve your audio setup.
Are All Microphones Created Equal for Your Voice?
It’s a widespread belief that any microphone will do as long as it’s “good enough.” However, this couldn’t be further from the truth. Different microphones have unique polar patterns, frequency responses, and sensitivities that shape your sound. For example, a top podcast microphone for voice-over work is meticulously chosen to complement specific vocal qualities, ensuring clarity and warmth. Relying on a generic mic might sound amateurish, especially if you’re aiming for professional-grade content.
Myth: Expensive Mics Always Sound Better
This is a common misconception. While high-end microphones tend to have superior components, the perceived sound quality heavily depends on proper setup, placement, and environment. An expensive mic can still produce poor audio if it’s not positioned correctly or if your room’s acoustics aren’t treated. Conversely, a well-chosen, affordable mic—like those highlighted in top voice recording microphones—can outperform pricier models when used optimally.
Beware of the Overhyped “Studio Quality” Label
Many mics are marketed as “studio-quality,” but this label often exaggerates their capabilities. The real secret lies in how you use the microphone—correct placement, gain settings, and post-processing matter more than the mic’s brand or marketing buzzwords. A popular mistake is assuming that simply purchasing a “studio” mic guarantees professional results without further effort. Remember, mastering your setup is key. For advanced tips, check out the ultimate guide to top microphone types.
How Do I Avoid the Dynamic Microphone Trap?
Many beginners default to dynamic microphones for all applications, thinking they’re more durable or better at noise rejection. While this is true in some cases, it’s a trap if you ignore the nuances. Condenser mics, for example, excel at capturing subtle vocal nuances and are preferred for studio recordings, but they’re more sensitive to background noise. Dynamic mics are better for noisy environments but can sound dull if not matched to your voice. The key is understanding your environment and voice characteristics. For guidance on this, look into the best XLR/USB microphones for your specific needs.
Have you ever fallen into this trap? Let me know in the comments. The more you understand these nuances, the more confident you’ll be in making a microphone choice that elevates your content rather than holding it back.
Once you’ve invested in the perfect microphone, the journey doesn’t end there. Maintaining your setup is crucial to ensuring consistent, high-quality audio over time. From cleaning your equipment to software tweaks, I’ll share the tools and methods I rely on to keep my microphone performing at its best and how you can do the same.
How do I maintain my microphone and setup over time?
Regular maintenance starts with physical cleaning. Dust, saliva, and debris can accumulate on your mic capsule and connectors, degrading sound quality. I personally use a soft, lint-free cloth and a small brush to gently clean the grille and body of my microphones. For delicate components, a compressed air canister helps remove dust from hard-to-reach areas without damage.
Beyond physical upkeep, software tools play a vital role. I recommend using a digital audio workstation (DAW) like Reaper or Audacity to fine-tune your audio post-recording. Applying gentle EQ adjustments and compression ensures your voice remains clear and balanced regardless of environment or mic aging. Regularly updating your audio drivers and firmware is also essential, especially if your microphone or interface manufacturer releases patches or improvements.
Another underrated maintenance tip is calibration. Periodically, I check my microphone’s performance by recording a test clip in a controlled environment and analyzing the frequency response and noise floor. If I notice any deviations, I revisit my placement and gain settings, or consider replacing worn cables. For cable management and replacement, I trust quality cables to prevent signal loss and interference.
Looking ahead, I predict that AI-assisted audio tools will become more mainstream, automatically detecting and correcting issues like background noise or distortion in real-time. This evolution will make maintaining high audio quality easier than ever, even for beginners.
To keep your microphone working flawlessly, integrate these maintenance routines into your regular setup check. Set a quarterly reminder to clean your gear, update software, and run performance tests. This proactive approach not only extends the lifespan of your equipment but also ensures your voice always sounds professional and polished.
Want to streamline your maintenance? I highly recommend trying out tools like iZotope RX for noise reduction and audio cleanup. These advanced features can save you hours of post-production time and help maintain a consistent sound profile. Make sure to explore the latest updates and tutorials to get the most out of your tools, as the right software can be a game-changer in your audio workflow.
Remember, the key to long-term success is regular attention and investing in reliable tools. By doing so, you’ll ensure your microphone continues to deliver crisp, clear sound for every recording or stream—no matter how long you’re in the game.
< >
>
Choosing the perfect microphone can feel overwhelming with so many options, but the right decision can elevate your content to professional levels. Reflecting on my own journey, I’ve realized that understanding your voice and environment is the key to making a smart investment. It’s not just about the latest tech or the most expensive gear—it’s about what truly complements your unique sound and setup.
Lessons I Learned from Mic Mishaps
- Don’t underestimate the power of proper placement—even the best mic can sound dull if positioned incorrectly. It took me trial and error to find the sweet spot that captures my voice naturally.
- Room acoustics matter more than you think—a good mic paired with poor space acoustics results in muddy sound. Investing in some basic sound treatment changed my recordings entirely.
- Every voice benefits from tailored settings—gain, EQ, and compression aren’t one-size-fits-all. Learning to tweak these settings made my audio clearer and more engaging.
- Myth-busting is crucial—not all expensive mics produce better sound; in fact, pairing a decent mic with optimal setup often beats pricier models used poorly.
Tools That Keep My Audio Sharp
- Top microphone picks for 2024—a curated list based on real-world performance and value, helping me choose gear that fits my needs.
- Best USB and XLR mics for streaming—these guides helped me understand the differences and pick the right type for my setup.
- Podcast microphones for voice clarity—a resource that refined my understanding of how mic choice impacts vocal warmth and detail.
- Ultimate guide to microphone types—deep insights into polar patterns and frequency responses that shaped my buying decisions.
Embrace Your Microphone Journey
Remember, the best microphone is the one that makes you feel confident and authentic. With consistent practice, proper setup, and a willingness to learn, your voice will resonate with clarity and professionalism. The future of audio is exciting, with AI tools promising even easier ways to perfect your sound, but your dedication today sets the foundation for success.
What’s the biggest challenge you’ve faced in choosing or setting up your microphone? Let me know below — I’d love to hear your story and help you overcome it!
This article really resonated with me, especially the emphasis on proper mic placement and understanding your environment. I remember initially using a condenser mic in a room with lots of echo, which made my voice sound muddy and distant. After adding some foam panels and adjusting my mic’s position closer to my mouth, the clarity improved drastically. It’s interesting how small tweaks can make such a difference. I’ve found that investing in a good pop filter also helps reduce harsh plosives and makes my recordings sound more professional. Have others here experimented with different mic placements or sound treatments that led to noticeable improvements? I’d love to hear your tips and tricks to optimize setups on a budget.
This article really hits home for me. I remember the frustration of trying different microphones, only to find that environment and placement had more impact on my sound than the mic itself. I started experimenting with sound treatment—adding foam panels and experimenting with mic angles—and the improvements were night and day. It’s incredible how small tweaks can turn a dull, echoey recording into something much more professional. I also learned that investing in a good pop filter made a big difference in reducing those harsh plosive sounds.
One thing I’ve found helpful is using software like Reaper to do a bit of post-processing—gentle EQ and compression make my voice clearer without sounding unnatural. My question for others is: how do you balance sound treatment costs with your setup’s needs? Do you find a certain budget-friendly solution that works well? It seems like every setup is different, and I’d love to hear some practical tips from fellow creators.