Ever spent hours fiddling with your microphone setup, only to realize your voice sounds scratchy, distant, or just plain off? I’ve been there. One frustrating afternoon I sat in front of my mic, convinced I’d broken something, only to discover I’d been using the wrong type of microphone for my setup. That lightbulb moment transformed my entire approach—and it’s why I want to share some honest tips about choosing the best USB and XLR microphones for podcasting and streaming in 2024.
Why Choosing the Right Microphone Matters More Than Ever
In the current landscape of content creation, your voice is your brand. Whether you’re recording a podcast, streaming live, or voice-over work, the quality of your microphone can make or break your audience’s experience. It’s shocking how many creators overlook this crucial detail early on. A good microphone doesn’t just capture your voice; it captures your personality, your passion, and your professionalism.
Did you know that according to a recent study, over 70% of new podcasters start with equipment that doesn’t suit their needs, leading to poor audio quality and eventual burnout? That’s a lot of wasted time and effort. When I started, I made the mistake of assuming any mic would do. Spoiler: it doesn’t. Your choice of microphone impacts everything from clarity to noise rejection, and it’s worth investing in the right one from the beginning.
Have you ever faced the frustration of recording with a microphone that just doesn’t sound right?
If so, you’re not alone. Many creators jump into content creation without understanding the differences between popular microphone types or which one fits their voice and environment best. The good news? There are clear options that won’t break the bank but will dramatically improve your sound.
Today, I’ll guide you through the top options for both USB and XLR microphones, highlighting what makes each one special and how you can make an informed choice. Whether you’re a beginner or looking to upgrade your gear, this guide will help you avoid costly mistakes and get your voice sounding professional fast. Ready to find out which mic is perfect for you? Let’s dive in!
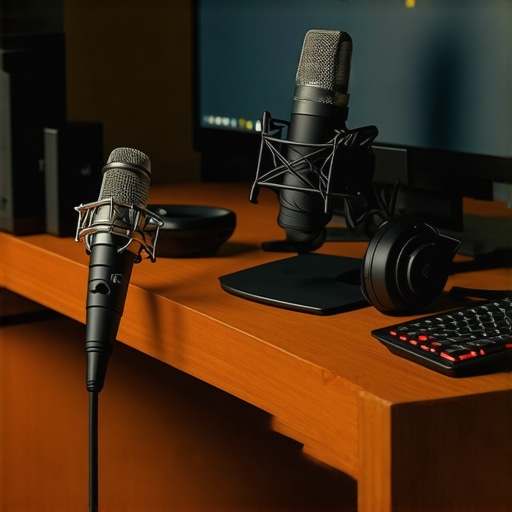
Select the Right Microphone for Your Setup
Start by assessing your environment and budget. If you’re recording in a noisy space or want simplicity, a high-quality USB microphone is your best bet. For professional-grade sound and flexibility, an XLR microphone paired with an audio interface offers superior quality. Consider your specific needs, space, and future expansion plans before making a choice.
Understanding Microphone Types and Their Uses
Identify Your Voice and Environment
Different microphones excel for different voices and spaces. For example, dynamic mics like the Shure SM58 are great for noisy environments because they reject background noise. Condenser mics, such as the Rode NT1-A, capture more detail but are sensitive to room acoustics. When I upgraded my setup, I initially used a condenser mic in a small room, which caused unwanted echo. Switching to a dynamic microphone drastically improved clarity and reduced ambient noise, making my recordings sound more professional. Learn more about best microphone types for voice recording and streaming.
Matching Microphone with Your Recording Style
If you prefer a hands-free, plug-and-play experience, a USB microphone with a built-in pop filter can make a difference. For more control over audio quality, consider an XLR microphone combined with a mixer or audio interface, allowing you to adjust gain, equalization, and more. I initially used a basic USB mic, but upgrading to an XLR setup with a dedicated interface brought my voice clarity to a new level.
Choose Quality Over Cost
Investing in a good microphone pays off. Cheap microphones often compromise sound quality and durability. For a professional sound, opt for models recommended in guides like top podcast microphones for streaming. Remember, your voice is your brand—quality equipment helps you stand out. When I switched to a well-reviewed XLR microphone, my audience immediately noticed the improvement, and my confidence grew with each recording.
Test and Tune Your Microphone
Once you’ve chosen your mic, spend time testing it in your recording space. Use a DAW or recording app to listen critically. Adjust gain levels, position the mic correctly—generally 6-12 inches from your mouth—and experiment with pop filters or shock mounts. I once recorded several episodes with the mic too close, causing plosive sounds. Moving it slightly back and adding a pop filter solved the problem, making my voice sound cleaner and more professional. For detailed guidance, check the ultimate guide to voice streaming microphones.
Optimize Your Recording Environment
Even the best microphone needs a good environment. Use sound-absorbing panels, carpets, or blankets to reduce echo. Position your microphone away from reflective surfaces. Consider a dedicated recording booth or a makeshift shield. I once set up a portable shield and acoustic panels in my closet, transforming a noisy room into a quiet studio. This drastically improved my audio quality and helped my voice stand out clearly. For more tips, see the ultimate guide to microphone types.
Final Tips for Consistent Quality
Keep your microphone clean and well-maintained. Regularly check cables and connections. Record test clips regularly to catch issues early. As you grow, consider upgrading to more advanced gear like the premium microphone options that suit your evolving needs. Remember, mastering your microphone setup is an ongoing process—constant testing and adjustment will keep your sound crisp and professional.
Many aspiring content creators fall into misconceptions about what makes a microphone truly suitable for podcasting or streaming. Let’s dig deeper into some of the most overlooked nuances and myths that could be sabotaging your audio quality. Contrary to popular belief, more expensive equipment doesn’t automatically mean better sound for every situation. The key lies in understanding the specifics of your setup and voice.
One common trap is the assumption that a USB microphone is always the best choice for beginners. While they offer plug-and-play convenience, they can also limit your future flexibility and control. Many overlook that an XLR microphone paired with an audio interface provides superior sound quality and expandability, especially as your skills grow. The myth that USB mics are “good enough” often leads to a bottleneck in audio clarity, especially in professional environments.
Another hidden trap is neglecting the importance of room acoustics. You might purchase a top-tier microphone but fail to treat your environment. An untreated room can turn a high-quality mic into a noisy mess, with echoes and background noises ruining your recordings. Even dynamic mics, which reject ambient noise better, benefit from proper placement and acoustic treatment. Don’t assume that your microphone alone will solve all your audio issues—your environment plays a crucial role.
What about the misconception that all microphones are created equal for voice recording?
This is far from true. Many creators overlook the importance of choosing a microphone that matches their voice and environment. For example, a dynamic microphone like the Shure SM58 can be a game-changer for noisy spaces, while a condenser mic like the Rode NT1-A captures more nuance in a controlled studio setting. The myth that condenser mics are always better for voice recording can lead to poor results if used in the wrong environment.
Finally, many underestimate the importance of proper mic placement and gain staging. Cranking the gain too high or placing the mic too close can cause plosives, distortion, or uneven levels. A simple yet often overlooked tip is to test your setup thoroughly, adjusting position and gain to find that sweet spot. Remember, even the most expensive mic will sound terrible if not used correctly.
In summary, the real secret to professional audio isn’t just about equipment but understanding its nuances—room acoustics, voice-mic matching, placement, and future-proofing your gear. Don’t fall into the trap of thinking more expensive or complex gear automatically equals better sound. Instead, focus on the right tools for your specific needs and environment. Have you ever fallen into this trap? Let me know in the comments!
Maintaining your podcast microphone setup over time is essential to ensure consistently professional sound quality. Whether you’re using a USB microphone or an XLR microphone, regular upkeep can prevent costly repairs and audio degradation. First, keep your equipment clean by gently dusting the grille and body with a soft, dry cloth. Avoid using harsh chemicals that could damage sensitive components. Regularly inspect cables for wear and replace any that show signs of cracking or fraying to prevent unexpected failures. For XLR setups, invest in quality connectors and avoid over-tightening to maintain good contact and signal integrity.
Software tools also play a crucial role in long-term maintenance. I personally rely on Reaper for its robust recording capabilities and built-in noise reduction plugins. It allows me to perform quick cleanup on recordings, removing hiss or background hum with minimal effort. For real-time monitoring and adjustments, OBS Studio is invaluable, especially for streamers. It helps me visualize audio levels and identify issues early, preventing audio clipping or distortion during live sessions. The future of voice recording tools points toward AI-powered noise suppression, which will make maintaining pristine audio easier even in less-than-ideal environments.
How do I maintain my microphone and gear over time?
Establishing a routine is key. Schedule regular cleaning sessions, check all connections before recording, and update your firmware and software when updates are available. Additionally, consider investing in a shock mount or pop filter to protect your mic from physical damage and plosive sounds. I’ve found that simple steps like these extend the lifespan of my equipment and keep my recordings consistently clear. As the trend toward smarter, AI-enhanced audio tools continues, staying updated with the latest software can give you an edge in producing high-quality content effortlessly. For example, the upcoming noise reduction plugins are predicted to become standard in most recording software suites, making maintenance even easier.
If you’re serious about long-term quality, I highly recommend trying out advanced noise reduction plugins and regularly calibrating your microphone placement. These small but impactful steps ensure your gear remains in top shape, helping you focus on creating engaging content without worrying about audio issues. Remember, consistent care today sets the foundation for professional sound tomorrow.
Choosing the right microphone for your podcast or stream can transform your content from amateurish to professional. Over the years, I’ve learned that understanding the nuances between USB and XLR microphones is essential. The key isn’t just about spending more but about selecting equipment that aligns perfectly with your environment, voice, and future goals. Investing wisely today means clearer, more engaging audio tomorrow.
Insider Wisdom from My Microphone Journey
- Room acoustics matter more than mic quality. I once bought a top-tier condenser mic only to realize echo and background noise sabotaged my recordings. Proper acoustic treatment made an immediate difference.
- Don’t overlook mic placement. Moving my mic just a few inches changed my voice’s clarity dramatically. A little experimentation with positioning and gain settings always pays off.
- Invest in future-proof gear. I started with a basic USB mic but quickly outgrew it. Upgrading to an XLR setup with an audio interface expanded my options and improved sound quality significantly.
- Room environment is your silent partner. Even the best mic won’t shine in a noisy, reflective space. Creating a dedicated quiet zone was a game-changer for me.
- Regular maintenance keeps your gear reliable. Cleaning, inspecting cables, and updating software ensure your setup stays top-notch and ready whenever inspiration strikes.
My Essential Toolkit for Voice Clarity
- Shure SM7B — A classic XLR microphone that offers professional quality and durability, perfect for serious content creators.
- Audio-Technica AT2020USB+ — A reliable USB mic that’s perfect for beginners seeking quality without complexity.
- Rode NT1-A — A condenser mic capturing rich detail, ideal for controlled environments.
- Focusrite Scarlett 2i2 — An audio interface that unlocks the full potential of XLR microphones by providing clean power and flexible controls.
Ignite Your Voice—Take Action Now
Don’t let subpar audio hold back your creative voice. With the right microphone choice and some dedicated effort in setup and environment, your recordings will sound more professional and engaging. The future of voice recording in 2024 is bright for those willing to learn and adapt. So, what’s stopping you from upgrading your sound today? Dive into the gear that suits your needs and start creating with confidence!
Have you ever struggled with choosing the perfect microphone setup? Let me know below, and share your experiences or questions!
,
Wow, this post really hits home! I remember starting out with a generic USB mic, and no matter what I did, my audio still sounded muddy and distant. Transitioning to an XLR setup with a decent interface like the Focusrite Scarlett 2i2 made such a difference in clarity and control. I especially agree with the point about environment; I used to record in a small, echo-prone room, which was a nightmare. Adding some acoustic panels transformed the space and improved my sound enormoously. One thing I’ve learned along the way is that mic placement is key — even the best mic can sound terrible if placed wrong. Do others have tips for optimizing mic placement without constantly changing the setup? I’d love to hear your tricks for keeping it simple but effective. Also, for those who are just starting out, I recommend investing in a good pop filter early on; it saves a lot of retakes. Overall, this guide is a goldmine for anyone serious about improving their podcast sound quality!
This post hits the mark perfectly. I used to struggle a lot with echo and background noise, especially in my small home office, before I finally invested in some acoustic treatment and a dynamic mic like the Shure SM7B. The impact on audio clarity was remarkable. I also found that mic placement makes a big difference—just a few inches can change the quality so much. One practical tip I can share is to use a small boom arm or adjustable stand; this helps maintain consistent positioning without the hassle of readjusting every time. Have others found any particular accessories or setups that help keep mic placement optimal and consistent? Also, I completely agree on the importance of environment; even the best gear can fall flat in a noisy room. How do you guys handle recording in multi-purpose spaces that aren’t soundproofed? Looking forward to insights from the community.
This article really hits home about the importance of the environment and equipment matching for good audio quality. I’ve learned that even with a decent mic, poor room acoustics can ruin your sound. Back when I started podcasting in a small, untreated room, my recordings had so much echo that it was hard to listen to. Upgrading to acoustic panels and choosing a dynamic microphone really improved things. I also found that microphone placement is crucial—experimenting with distance and angle made a noticeable difference. A question I have: for those recording in shared spaces or rooms not dedicated solely to podcasting, what’s your best tip for reducing ambient noise without investing in costly treatments? I’ve tried using blankets and foam panels stuck onto walls, but they don’t always make a big impact. Would love to hear some practical hacks from the community. Thanks for the detailed guide, it’s inspiring me to refine my setup even more.