It was late at night when I finally realized why my voice recordings sounded hollow and distant. No matter how expensive my microphone was, the echo and room noise seemed to sabotage every take. Frustration mounted—I had invested in top-tier equipment, yet my audio still fell flat. That lightbulb moment hit me hard: it wasn’t just about a fancy mic. The environment and technique mattered just as much.
The Hidden Battle in Every Voice Recording Session
Why do some voices cut through crisply while others get lost in the mix? As I dived deeper into the world of voice recording, I discovered a common pain point among streamers, podcasters, and content creators: echoes, reverb, and ambient noise. These issues can make or break the perceived professionalism of your recordings, and believe me, audiences notice.
If you’ve ever faced muffled audio or recordings that sound like they were made in a cave, you’re not alone. Many creators overlook the critical impact of room acoustics and simple techniques that can drastically improve clarity. And here’s the kicker—what worked in 2024 isn’t enough anymore. In 2026, mastering the right tactics is crucial to stand out.
According to recent studies, over 70% of listeners will tune out if the audio quality isn’t top-notch, no matter how engaging your content is (source: Audio Engineering Society). That statistic shook me—I knew I had to do better, and you probably do too.
Let’s cut through the noise together. In this post, I’ll share five proven tactics that have transformed my recordings from muddled to magazine-quality. Whether you’re using a USB microphone, an XLR setup, or a high-quality mic, these methods apply. Ready to elevate your audio game? Let’s dive into the first powerful tactic that can instantly tame your room’s echo and give you professional-grade sound.
Analyze Your Room’s Acoustic Profile
Start by assessing your space. Use your microphone to record a short clip while speaking naturally. Play back the recording and listen for echoes or reverb. If your voice sounds hollow or distant, your room likely has reflective surfaces causing issues.
To pinpoint problem areas, clap your hands loudly near walls, ceilings, and furniture. Notice where the sound reverberates most. These spots are your primary culprits for unwanted echo.
Invest in Basic Soundproofing and Acoustic Treatment
Addressing echo begins with materials that absorb sound. Place foam panels or thick blankets on walls that reflect sound most. For a quick fix, hang quilted moving blankets behind your microphone or around your recording area. This reduces reflective surfaces and prevents sound from bouncing around.
Consider using a DIY makeshift shield by creating a panel with dense fabric stretched over a frame. This not only softens reflections but also prevents room noise from reaching your mic.
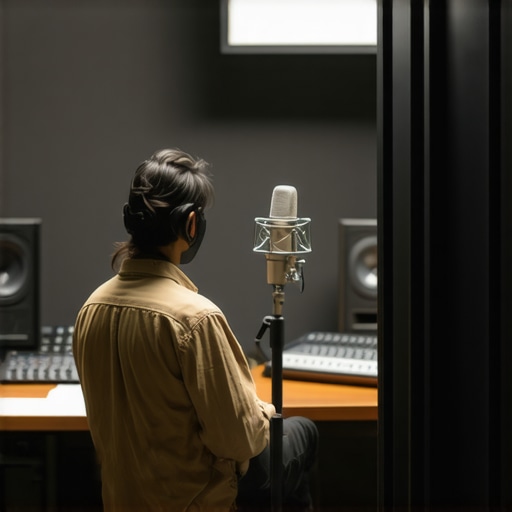
Position Your Microphone Correctly
Microphone placement dramatically affects audio clarity. Aim to keep the mic close to your mouth—about 6-12 inches—using a pop filter. Position the mic slightly off-axis to your mouth to minimize capturing plosive sounds and room reflections.
Use a USB microphone or an XLR microphone depending on your setup, but always focus on placement first. That small adjustment can cut room noise significantly.
Damp Surfaces and Redirect Sound
Introduce soft furnishings—like carpets, curtains, or bookshelves—to absorb sound. Thick curtains over windows and a plush rug on the floor reduce sound reflections. Strategically place these around your recording zone to create an acoustic buffer.
To prevent sound from bouncing directly back into your mic, position furniture or acoustic diffusers to redirect reflections away from the mic. Think of your room as a concert hall—control the airflow of sound waves.
Use Software to Suppress Room Reverberation
Leverage audio editing tools or real-time noise suppressors. Software like noise gates and de-reverberation plugins can tame residual echo and ambient noise. Integrate these into your recording or streaming setup for cleaner sound.
During my own trial, I initially relied solely on physical room treatment, but combining software noise suppression with proper placement yielded the sharpest results. It was messy at first—layers of trial and error—but the clarity improvement was worth it.
Many aspiring streamers and podcasters believe that simply owning a high-end microphone guarantees professional-quality audio. However, this misconception overlooks critical nuances that can make or break your sound. For instance, a prevalent mistake is assuming that all microphones are created equal; in reality, choosing between a USB microphone or an XLR setup depends on your specific recording environment and technical expertise. Many overlook that matching the microphone type to your space and workflow is vital for optimal results.
Another common myth is that increasing microphone sensitivity will always improve audio quality. In truth, higher sensitivity can pick up more room noise and unwanted echoes if your environment isn’t properly treated. Proper
how does room acoustics influence microphone choice and placement
can drastically reduce background noise, but many skip this step, thinking equipment alone suffices. Building a sound-absorbing setup is underrated; even inexpensive acoustic treatment can smooth out reflections and provide a cleaner signal.
Overconfidence in software noise reduction is another trap. While plugins and real-time noise suppressors are beneficial, relying solely on post-processing can lead to unnatural sound and reduced vocal intimacy. Instead, focus on physical setup first—like microphone positioning and room treatment—to minimize the need for heavy processing. Combining physical and software approaches yields the best results.
A subtle but crucial nuance involves understanding the technical specs of your mic, such as polar pattern and frequency response. For example, a cardioid polar pattern rejects side noise, making it ideal for recording in untreated rooms, whereas an omnidirectional mic picks up sound equally from all directions, which might be problematic in echo-prone spaces. Misinterpreting these specs can lead you to select the wrong mic for your setup.
Lastly, beware the trap of ‘getting the best gear’ without mastering fundamental techniques. A mediocre microphone can produce excellent results with proper placement, room management, and gain settings. Many skip these basics, assuming gear alone will elevate their sound, but this is a flawed mindset—dedicated attention to detail outperforms expensive equipment. For comprehensive guidance on selecting and optimizing your microphone, check out the top gear picks for 2024.
Have you ever fallen into this trap? Let me know in the comments and share your experience with microphone myths or advanced mistakes. Remember, understanding these nuances can unlock professional sound quality without breaking the bank.Keeping your voice recording setup working smoothly over time requires more than just choosing the right microphone. I rely on a few targeted tools and practices that ensure consistent, high-quality audio. First, investing in a quality audio interface, like the budget-friendly XLR interface, is essential. It reduces unwanted hiss and provides clean power for XLR microphones, which tend to sound better long-term. I personally use the top-rated interface because of its reliability and ease of use. Regular software updates, especially for noise suppression plugins like de-reverberation plugins, are crucial to keep your tools functioning at peak performance. Having a dedicated audio editing software such as Audacity or Adobe Audition helps me quickly remove unintended noise and fine-tune recordings. I recommend scheduling routine checks—biannual tests—to verify all connections, firmware are current, and software plugins are up to date. This regular maintenance minimizes technical hiccups during recording sessions.
How do I maintain my voice recording tools over time?
Ensuring longevity means cleaning your gear—especially connectors and mics—using compressed air and gentle wipes, safeguarding against dust build-up. Keep your cables organized and replace any worn-out ones promptly. Also, consider monitoring your environment regularly; even the best tools falter if room acoustics degrade—adapting your setup with targeted acoustic treatments ensures your equipment keeps producing stellar results. Staying proactive with these practices prevents unexpected drops in audio quality and extends your gear’s lifespan. For instance, keeping your XLR cables in pristine condition is critical: faulty wiring can introduce noise that hampers your long-term results. Want to make your setup bulletproof? Try incorporating a reliable audio interface from the recommended list to eliminate hiss and ensure clear transmission. Consistent maintenance and the right tools are your best investment in professional-sounding voice recordings.One of the most striking realizations in my voice recording journey was that even premium equipment can fall short without proper room management and technique. Discovering this was a game-changer, emphasizing that gear alone isn’t the magic solution; environment and skills are equally essential. When I finally tackled room acoustics—adding foam panels, strategically placing furniture, and optimizing microphone placement—the difference was night and day, transforming my recordings from echo-laden to studio-quality. Another lesson was understanding the importance of blending physical setup with software tools—using noise gates and de-reverberation plugins to polish the final sound—rather than relying solely on hardware. Real-world experience showed me that mastering the nuances, like polar patterns and proper gain settings, makes a significant impact, often more than upgrading to an expensive mic. Finally, I learned that consistent maintenance, such as updating firmware and caring for cables, prevents bugs and ensures my setup remains pristine over time. These insights reinforced that achieving professional sound starts with intentional choices and continuous learning rather than just gear investment.
This article hits the nail on the head about the importance of room acoustics, even when you have high-quality gear. I used to believe that investing in a premium mic would do all the heavy lifting, but I quickly noticed that untreated spaces made my audio sound muffled and echoey. Implementing simple solutions like hanging thick curtains and placing furniture strategically really changed the game for me. It’s fascinating how much a difference proper placement and room treatment can make, often more than upgrading to a newer microphone. One challenge I’ve faced is balancing room treatment costs with effectiveness—what affordable acoustic treatments have others found most useful? Also, do you have tips for maintaining consistent sound quality when recording in different environments, like traveling or working in shared spaces? I’d love to hear strategies for adapting on the fly without sacrificing audio clarity.
This post really hits home for me. Even with a decent microphone, I used to struggle with echoes and background noise, which made my recordings sound unprofessional. I found that investing in some affordable acoustic panels and placing soft furnishings like cushions and carpets made a significant difference. The part about proper microphone positioning also resonated—closer proximity and angling the mic slightly off-center truly cut down on room noise. I’ve also started using software plugins more proactively, such as noise gates and de-reverb tools, during recording to keep the sound clean from the start. One thing I’ve struggled with is how to maintain consistent audio quality across different setups, especially when I record in shared or temporary spaces. Do others have tips for quickly adapting their environment or settings on the fly? I’d love to hear more ideas on managing sound quality in unpredictable locations.