Have you ever recorded a podcast episode only to realize later that your voice sounded distant, muffled, or just plain flat? I remember my own lightbulb moment, fumbling through a cluttered desk with tangled wires and a cheap microphone that struggled to capture my voice clearly. The frustration was real. It felt like no matter how much I tweaked my settings, the quality just wouldn’t match my passion for sharing stories. That’s when I finally understood — the microphone I choose isn’t just gear; it’s the foundation of my entire podcasting journey.
Fast forward, I’ve spent years testing, researching, and listening to countless microphones. Today, I want to spare you the trial and error. In this guide, we’ll dive deep into the top microphones for 2024 that can turn your recordings from amateurish to professional. Whether you’re just starting out or looking to upgrade your setup, I’ll help you find the perfect match for your voice and budget. Ready to sound better than ever? Let’s get into it.
Your Microphone Matters More Than You Think
Choosing the right microphone isn’t just about picking the most expensive model. It’s about understanding the nuances of your voice, your environment, and your goals. A good mic can make your content more engaging, help you connect with your audience, and even boost your confidence behind the mic. But here’s the kicker — making a smart choice can be daunting with so many options flooding the market.
Early on, I made a classic mistake: I bought a flashy, high-end microphone without considering my recording space or voice. The result? Echoes, background noise, and a lot of frustration. That mistake taught me a vital lesson—know what you need before investing. Luckily, there are clear options tailored for different scenarios, from simple USB mics for beginners to professional XLR setups for seasoned creators. If you’re wondering whether your current gear is holding you back, I’ve got plenty of insights to help you decide if it’s time for an upgrade.
Is a Microphone Upgrade Actually Worth the Hype?
Many skeptics wonder if investing in a top-tier microphone really pays off. Trust me, it does — but only if you choose wisely. The truth is, a microphone designed for your specific voice and environment can dramatically improve your clarity and presence. Plus, with the right setup, you won’t need to spend hours editing or fixing audio issues. Curious about the best options for 2024? Check out this comprehensive list of top microphones for streaming and podcasting in 2024.
My early mistake was overlooking the importance of room acoustics and microphone polar patterns. Knowing what to look for in a microphone, such as cardioid patterns to minimize background noise, can save you a lot of headaches down the line. It’s all about aligning your gear with your goals and environment.
Now that we’ve set the stage, let’s explore the types of microphones available and figure out which one fits your needs best. Your perfect sound is within reach, and I can’t wait to help you get there.
},
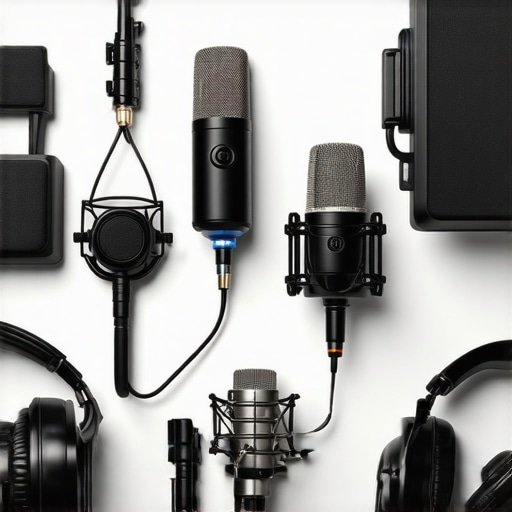
Select the Right Microphone Type for Your Space and Goals
Start by evaluating your environment and what you want to achieve. If you record in a noisy space or need a simple plug-and-play solution, a USB microphone is ideal. For more control over sound quality and equipment, consider an XLR microphone. Knowing the differences helps you narrow down options that suit your needs, whether for streaming, professional podcasting, or casual content creation.
Match Your Microphone to Your Voice and Environment
Every voice is unique, and your space affects how your mic performs. When I upgraded from a generic mic to a cardioid condenser, I noticed a huge difference in clarity. The cardioid pattern minimizes background noise, making it perfect for home studios or noisy environments. To visualize this, think of your microphone like a flashlight—focusing on your voice and dimming the noise around you. Explore top voice microphones for 2024 to find models tailored for different voice types and environments.
Set Up Your Microphone for Optimal Sound
Proper placement is key. Position your mic about 6-12 inches from your mouth, slightly off-center to avoid plosive sounds. Use a pop filter—like a shield for your voice—to reduce harsh sounds and protect your mic. When I first set up my mic, I played around with distance and angle until I got a warm, clear tone. Remember, even the best mic can sound bad if it’s not positioned correctly. Invest in a sturdy stand and consider acoustic treatment if your room echoes—think of it as giving your microphone a cozy, sound-optimized environment. For detailed setup tips, check out top microphones for streaming and recording in 2024.
Test and Fine-Tune Your Audio
Before recording your full episode, always do a test. Record a short clip and listen critically. Use audio editing software to check for background noise, volume consistency, and clarity. Adjust your mic position, gain settings, or room acoustics as needed. I once recorded a whole episode with a slightly off-angle mic, which resulted in muffled sound. Re-recording was frustrating, but it taught me the importance of testing before going live. Remember, a little effort in setup pays off with professional-sounding audio. For more insights on gear and setup, explore best microphones for podcasting and streaming in 2024.
Many aspiring podcasters and streamers fall into the trap of believing certain misconceptions about microphones that can hinder their audio quality. Let’s dig deeper into these myths and uncover the nuanced truths that can elevate your setup. One prevalent myth is that investing in the most expensive microphone guarantees professional sound. While high-end gear has its benefits, the real magic lies in pairing the right microphone with your environment and voice. For example, a top-tier condenser mic won’t shine in a noisy room or if you don’t set it up correctly. Instead, focus on selecting a microphone that suits your specific needs—whether it’s a top voice microphone for your voice type or one with an appropriate polar pattern to minimize background noise.
Another widespread misconception is that all microphones are created equal. In reality, different types—like dynamic, condenser, or ribbon—have distinct characteristics and ideal use cases. For instance, many think condenser mics are universally better, but they can pick up more room noise, making them less suitable for untreated spaces. Conversely, dynamic mics excel at rejecting ambient sounds and are perfect for noisy environments or live settings. Understanding these nuances can prevent costly mistakes. For advanced users, exploring microphone types helps you make smarter choices.
Now, here’s a trap that many overlook: mic placement. The common belief is that just holding the mic close to your mouth is enough. However, positioning plays a critical role, impacting tone, plosive management, and background noise rejection. A mic set too close can cause harsh plosives, while too far can result in distant, muffled sound. Optimal placement—about 6-12 inches from your mouth, slightly off-axis—is crucial. Also, don’t forget the importance of using a pop filter and acoustic treatment. Without proper placement and environment, even the best microphone can sound subpar. For in-depth setup tips, check out setup best practices.
Finally, many believe that post-processing can fix poor audio. While editing can improve certain issues, it’s no substitute for good initial recording techniques. Relying solely on editing to fix a badly recorded audio can introduce artifacts and reduce clarity. Instead, focus on getting the best sound possible during recording—test your setup, adjust your positioning, and ensure your environment is optimized. This proactive approach saves time and results in a more professional outcome. For more advanced insights, see our guide on recording techniques.
Keeping your podcast microphone in top shape requires more than just good care—it involves investing in the right tools and adopting consistent maintenance routines. Over time, even the most robust gear can suffer from dust, moisture, or wear and tear, which can compromise your audio quality. That’s why I always recommend a set of specific tools and practices to ensure your microphone stays reliable and delivers professional sound for years to come.
First and foremost, a high-quality microphone pop filter is essential. I use a metal pop filter because it’s durable and easier to clean than foam alternatives. It protects your mic from moisture caused by breath and prevents plosive sounds that can distort recordings. Regularly cleaning your pop filter with mild soap and water keeps it free of dust and bacteria, ensuring it continues to perform effectively.
Next, consider a microphone shock mount. This tool isolates your mic from vibrations and handling noise—a common issue when recording at home or in less-than-ideal environments. I personally prefer shock mounts with adjustable tension, making it easier to secure different mic models and reduce unwanted noise, especially if you tend to move around while recording.
For routine maintenance, a can of compressed air is invaluable. I use it to blow out dust from the grille and internal components of my XLR setup. Dust accumulation can lead to static noise or even damage the delicate capsules inside condenser microphones. A quick, gentle blast every few months keeps everything clean without risking damage.
Beyond physical tools, software plays a critical role in maintaining audio quality. I rely on DAWs like Reaper or Audacity for post-recording checks. Regularly reviewing your recordings helps catch issues early, such as background noise or inconsistent volume, which can be corrected with equalization and noise reduction tools. These software solutions are continuously improving, and I predict that AI-driven noise suppression will become standard in 2024, making maintenance even easier.
Another tip I swear by is maintaining a consistent recording environment. Acoustic treatment like foam panels or diffusers not only improves sound clarity but also reduces the strain on your gear. When your environment is stable, your microphone faces fewer challenges, prolonging its lifespan and ensuring consistent quality.
How do I maintain my microphone over time?
Regular inspection is key. Check for visible dust, loose parts, or signs of wear. Replace worn-out cables immediately—using inferior cables can cause static or dropouts. Also, keep your gear in a dedicated case or protective cover when not in use to prevent physical damage and exposure to dust or moisture. Lastly, schedule a bi-annual check-up where you test your setup, clean components, and update firmware or drivers if applicable. Trust me, these small but consistent efforts can extend your microphone’s life significantly and keep your audio crisp and professional.
By investing in quality tools like shock mounts, pop filters, and compressed air, and adopting a disciplined maintenance routine, you ensure your gear remains reliable and your sound stays clear. As technology advances, I believe automated diagnostics and smarter maintenance tools will make this even easier in the future. So, go ahead—try out a new cleaning method or upgrade your shock mount this year. Your future self will thank you for it!
The Hardest Lesson I Learned About Microphone Choices
Early in my journey, I believed that investing in the most expensive microphone would instantly elevate my podcast quality. I learned this isn’t true. The real lesson was understanding my environment and voice. A high-end mic in a noisy room still sounds amateurish if I don’t optimize placement and acoustics. My biggest lightbulb moment was realizing that gear alone isn’t enough—how you use it matters more than price.
Three Myths About Microphones That Held Me Back
One myth was that condenser mics are always better for vocals—turns out, they’re not ideal in untreated rooms. Another misconception was that all microphones are created equal; in reality, dynamic mics excel at rejecting background noise, perfect for noisy environments. The third mistake I made was assuming mic placement doesn’t matter. Positioning your mic correctly can make or break your sound, regardless of the model.
What Experts Won’t Tell You About Microphone Maintenance
Most overlook the importance of routine cleaning and proper storage. I’ve found that simple tools like a shock mount and a pop filter aren’t just accessories—they’re essential for longevity. Regularly inspecting cables and cleaning dust prevent static and static noise. These small maintenance habits keep my gear performing at a professional level, saving me time and money in the long run.
My Essential Toolkit for Podcasting in 2024
My go-to tools include the best microphones for streaming and podcasting in 2024, a high-quality shock mount, and a reliable pop filter. I trust these because they’ve proven durable and deliver clear, professional sound. Additionally, I use top audio editing software to fine-tune recordings, ensuring I always sound my best.
Find Your Voice and Make It Shine
Getting your microphone setup right is just the beginning. The real magic happens when you consistently refine your environment, test your gear, and understand your voice’s nuances. Your perfect sound is within reach—don’t wait to take that leap. Remember, every episode is an opportunity to improve and connect more deeply with your audience.
What’s Your Next Step to Better Podcast Sound?
Have you ever struggled with mic placement or choosing the right gear? Share your experience below and let’s grow together!
Reading through this comprehensive guide really resonated with my own experience as a new podcaster. When I first started, I bought a flashy microphone without considering my room acoustics or voice characteristics, which led to muffled audio and frustrating editing sessions. Since then, I’ve learned that understanding your environment and microphone type makes all the difference. I especially appreciate the emphasis on proper placement and acoustic treatment—things I overlooked initially, but now see as crucial. How do others handle noise in less-than-ideal spaces? I’d love to hear tips on affordable acoustic solutions for small home studios that don’t break the bank.
This guide really hit home for me, especially the part about microphone placement and room acoustics. Like many beginners, I initially thought that just buying a decent mic would solve all my audio issues, but I quickly learned that environment plays a huge role. I started experimenting with portable acoustic panels and foam tiles, which made a noticeable difference without breaking the bank. It’s amazing how much clearer your voice can sound when you reduce room echo and background noise. I’d be curious to hear from others—what affordable solutions have you found effective for controlling noise at home? Also, do you prefer physical acoustic treatments or software-based noise reduction tools? Personally, I lean towards combining both for the best results. Looking forward to hearing everyone’s tips and experiences on creating that professional sound in a home setup.
This post really resonated with me because I’ve been through the frustration of capturing good sound quality in a less-than-ideal environment. When I started, I also thought a higher-end microphone would instantly fix everything, but I quickly realized that setup, positioning, and room acoustics make a huge difference. I remember experimenting with different mic placements and realizing that even minor adjustments can drastically improve clarity. What I’ve found most effective is layering simple acoustic treatments like foam panels and using directional microphones to focus on my voice and minimize background noise. I’m curious, has anyone here tried DIY acoustic solutions? I’ve seen some clever homemade ideas that don’t require a big budget. And for those dealing with noisy rooms, what’s your go-to trick to keep the sound professional without investing heavily in studio treatment? Would love to hear your tips and experiences!