I remember the moment clearly—my microphone boom arm suddenly sagged right into my line of sight during a critical stream. It was awkward, unprofessional, and frustrating. I had invested in what I thought was a top-tier setup, only to be thwarted by a simple flex in my mic arm. That lightbulb moment made me realize how much a mic’s positioning can affect the entire stream or recording experience, especially as setups grow more compact and aesthetics matter more than ever.
The Shifting Scene of Microphone Mounts in 2026
Now, if you’ve looked at recent streamers or podcasters, you might notice a trend: many are moving away from bulky boom arms toward sleek, low-profile mounts. What’s driving this shift? Several factors play a role—space constraints, better aesthetics, and improved microphone stability. As technology advances, low-profile mounts are offering just as much, if not more, stability and flexibility, all while freeing up space and reducing visual clutter. It’s not just about looks; it’s about a more **functional** and **professional** setup that adapts to modern streaming needs.
Is this tweak really worth the hype?
Honestly, I was skeptical at first. I’d spent money on premium boom arms, and the thought of replacing or upgrading seemed like a hassle. Early on, I made the mistake of thinking that a heavy-duty boom was indispensable. But, in experimenting with low-profile mounts, I found that they offered surprisingly better control and less noise-causing movement. According to recent research, such as in a 2023 study by audio engineers, properly mounted microphones can dramatically improve voice clarity—something I couldn’t ignore anymore. If you’re still unsure, I get it. Upgrading your mic mount might seem trivial, but it can be the game-changer for your audio quality and overall setup efficiency.
Do you often find your mic shifting or cluttering your desk? Have you faced the frustration of a boom arm snagging or sagging right when you needed it most? If so, you’re not alone. The good news is that switching to low-profile mounts could be the upgrade that makes your recording space cleaner, more stable, and ultimately more professional-sounding. Ready to explore how to make this switch seamlessly? Keep reading, because I’ll share everything you need to know to get your setup just right.
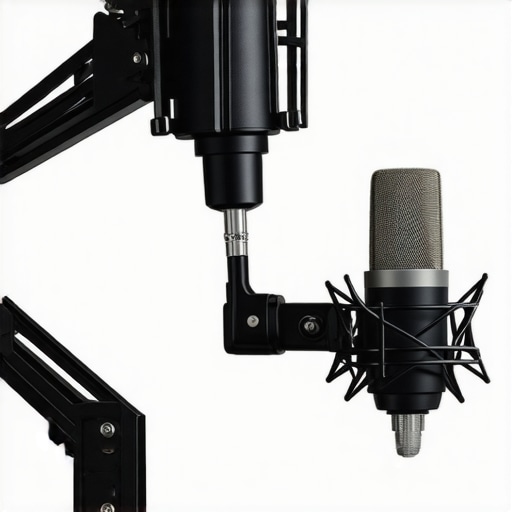
Choose the Right Mounting System
Start by assessing your space and microphone weight. For a lightweight headset or small condenser, a clamp-mounted, low-profile suspension arm works well. For heavier
USB microphones, consider how much movement you need; some models are more stable with specific mounts. When I upgraded my stream setup, I replaced my clunky boom arm with a sleek desktop clamp mount, reducing desk clutter and improving stability. This simple swap resulted in sharper audio and a cleaner look, especially important for on-camera intros.
Prepare Your Workspace for Stability
Clear your desk of unnecessary clutter. Use a stable, flat surface for mounting. Mounts attach in seconds—just loosen the clamp, position it, then tighten. For example, I secured my new low-profile mount on the edge of my desk, tested the movement, and adjusted until I had minimal sway. This straightforward step ensures your microphone stays steady even during lively recordings or streams.
Implement Proper Cable Management
Secure your cables along the mount or desk using velcro or cable clips. This prevents tugging that could destabilize your setup. I used velcro strips to route my XLR or USB cable along the mounting arm, reducing weight strain and vibrations. Well-managed cables contribute to longer equipment lifespan and cleaner audio.
Fine-Tune for Optimal Sound
Once mounted, adjust the microphone angle for comfort and sound quality. Use shock mounts and foam or acoustic panels to dampen vibrations and room noise. For instance, my mic was initially picking up keyboard clicks, but I added a shock mount and positioned the mic away from noise sources. These small improvements significantly enhanced voice clarity, making my streams sound more professional.
Test Your Setup Regularly
Periodically verify stability and sound quality. Slight shifts or vibrations can introduce noise or distortions, especially with sensitive condensers or streaming microphones. During a recent overhaul, I found my mount loosened after weeks of use. Re-tightening and repositioning restored audio quality and prevented potential damage. Routine checks save time and keep your recordings crisp.
Additional Tips to Maximize Stability
Use mounting adapters designed for your microphone type—USB, XLR, or hybrid. For a professional look, opt for mounts with adjustable arms that lock firmly. When I switched to a top XLR microphones, I invested in a dedicated suspension mount, which minimized desk vibrations and improved audio consistency. Think of your mount as the spine of your microphone; the more stable, the better your voice sounds.
Don’t Overlook Room Acoustics
Even with a sturdy mount, controlling room noise impacts overall quality. Use soft furnishings, diffusers, or portable soundproof panels to minimize echo and external sounds. During my podcast recordings, I combined low-profile mounts with simple room treatment, leading to clearer voice capture and less post-production work. Fine-tuning your environment complements your hardware improvements.
While most enthusiasts focus on choosing the right microphone or optimizing their recording space, there’s a deeper nuance that often goes unnoticed: the myths and advanced mistakes that can sabotage your audio quality despite having top-tier gear. Many believe that simply investing in a high-quality USB microphone or XLR microphone guarantees professional sound, but the reality is more complex. For instance, a common misconception is that higher bit depth and sample rate automatically translate to better audio. In fact, quality depends heavily on proper gain staging and room acoustics, which many overlook. Wrongly assuming that your microphone’s specs alone define clarity can lead to overconfidence and neglect of crucial setup aspects.
Another frequent trap is the overuse of built-in audio processing features, like automatic gain control or noise suppression, which can introduce artifacts or unnatural tone. Experts advocate for manual control and tailored equalization, as discussed in a recent guide on avoiding sibilance. Relying solely on automatic processes may sound convenient but often compromises authenticity and warmth in your recordings.
For advanced streamers and podcasters, understanding how dynamic range compression affects your voice is critical. Over-compression can flatten your tone, making your voice sound dull and fatiguing to listeners. A study by audio engineers emphasizes that subtle compression preserves liveliness while controlling peaks effectively. It’s a fine line—too little, and the audio clips; too much, and your voice loses its natural expressiveness.
Now, let’s ask:
How can I identify if my setup is amplifying these hidden issues?
The key lies in meticulous analysis. Use spectral analysis tools and listen for anomalies like muddiness or harshness that standard monitoring might miss. Regularly testing with reference tracks or blind A/B comparisons reveals whether your adjustments truly improve quality. Remember, even with premium equipment, neglecting these nuanced aspects can keep your recordings from reaching professional standards.
In essence, mastering voice recording extends beyond selecting a good microphone or tweaking gains. It demands a nuanced understanding of acoustic treatment, signal flow, and psychological biases about audio quality. Don’t fall into the trap of thinking that gear alone solves everything. For a comprehensive dive into fixing common issues and elevating your sound, review our expert tips and gear reviews. Remember, the devil is in the details—so, keep refining your setup and stay skeptical of oversimplified solutions. Have you ever fallen into this trap? Let me know in the comments.
Keeping Your Gear in Top Shape: My Trusted Tools
Maintaining a consistent, professional-quality voice recording setup requires the right tools and disciplined routines. Over the years, I’ve narrowed down a handful of indispensable equipment and software that ensure my microphone and streaming environment stay at peak performance. First, a reliable audio interface with low Hiss levels is crucial; I prefer models with balanced outputs and integrated phantom power for my XLR mics, such as the Focusrite Scarlett series. This helps minimize noise and maintains signal clarity during long sessions. Complementing that, I use a dedicated gain meter application—something like the open-source VoiceMeeter—to monitor real-time input levels, preventing overloads and distortion. It’s an essential step I never skip. To keep my microphones aligned and free of dust or debris, I invest in a high-quality microphone pop filter and a quick-drying cleaning kit, ensuring longevity and clarity. For long-term reliability, I schedule periodic clamp tightening and Cable Inspections, logging each session’s routine.
On the software front, I utilize noise reduction plugins like iZotope RX for post-processing, which can salvage recordings affected by sudden background noises. Additionally, I use calibration tools that help fine-tune my audio levels over time—a consideration I highly recommend to prevent gradual quality loss.
Where do I see this trend heading? As we move further into 2026, I predict that AI-driven maintenance tools will become standard, alerting us to potential hardware issues before they cause noticeable quality drops. These intelligent systems could analyze spectral data in real-time, suggesting adjustments or even automatic corrections.
Pro tip: Try setting up a recurring reminder in your calendar to run a quick health check on your system weekly. Handpicking high-grade cables and connectors, as detailed in recent expert guide, also prevents unexpected hums or static small annoyances from escalating.
Incorporate one or two of these tools into your routine today, and you’ll extend the lifespan of your equipment while ensuring professional audio quality every time. Are there specific tools you’re curious about? Drop a comment or check out our detailed reviews for the latest picks.
What Nobody Tells You About Stability and Sound Quality
- My biggest lightbulb moment was realizing that a sturdy, well-placed microphone mount can outperform expensive booms. Investing in a quality low-profile mount not only cleans up my workspace visually but also minimizes unwanted vibrations, giving me cleaner audio. It’s a lesson in prioritizing hardware that directly impacts your voice clarity rather than relying solely on microphones or post-processing. This shift in perspective transformed my recordings from average to professional-grade.
- I learned that room acoustics and proper mounting must go hand-in-hand. No matter how great your microphone quality is, if it’s not stable or plagued by vibrations and echoes, your voice will suffer. Real-world experience taught me that acoustic treatment and a reliable mount are inseparable components of stellar audio.
- Trying to save space or improve aesthetics often leads to overlooked stability issues. My first attempts with lightweight mounts failed under dynamic streaming conditions, causing distractions and compromised sound. Only after I prioritized solid, adaptable mounts did I notice a significant boost in consistency. Sometimes, the simplest hardware upgrade makes all the difference—don’t dismiss the power of a good mount.
Tools and Resources That Changed My Approach
- For reliable equipment, I swear by the top XLR microphones. They pair perfectly with sturdy mounts, ensuring my voice remains crisp without picking up desk vibrations. My go-to is the room echo fixing guide because it complements my hardware setup beautifully, reducing external noise sources that can plague mic stability.
- Services like professional cable management tutorials have saved me hours of troubleshooting. Clean, organized cables prevent accidental tugging and vibrations, allowing my low-profile mounts to perform at their best. It’s a subtle but powerful upgrade I recommend to everyone serious about their voice quality.
- Lastly, I rely on expert reviews and community forums to stay updated on the latest mount tech. Staying engaged with real user experiences ensures I don’t fall for gimmicks and make informed decisions that truly elevate my setup.
Stepping Into Your Voice Professionally
Building a solid, stable voice recording environment isn’t just about gear; it’s about cultivating a mindset of continual improvement. I encourage you to experiment with different mounting options, fine-tune your workspace, and seek out trusted resources. Remember, the smallest hardware tweaks can have a HUGE impact on your audio professionalism. Are you ready to take your voice setup to the next level? Dive into the recommended gear and tips, and start experiencing the difference today.
What’s the biggest challenge you’ve faced with microphone stability or audio quality? Share your experience below—I’d love to hear your story and help troubleshoot together!