It was a frustrating morning, trying to set up my new streaming microphone before a scheduled session. The darn thing kept popping, humming, and sounding tinny—no matter how much I fiddled with the settings. I remember thinking, *There has to be a better way.* That lightbulb moment hit hard: by 2026, USB microphones have finally caught up—and in many cases, surpassed—entry-level XLR mics in quality and convenience.
Embracing the USB Microphone Revolution
For years, I was a staunch supporter of XLR systems, convinced they offered superior sound and flexibility. But the truth is, modern USB microphones have evolved rapidly, offering stunning audio clarity without the complicated setup or hefty price tag. If you’ve ever felt overwhelmed by the mess of cables, interfaces, and settings, you’re not alone. Many content creators and podcasters are discovering that today’s USB mics are not just good enough—they’re often the smarter choice.
Think about it: a study by Creator Setup Guide indicates a significant shift among professionals away from traditional XLR gear in favor of high-quality USB solutions. Simplifying your workflow without sacrificing quality can be a game-changer, especially when time and budget are tight.
Have you faced the hassle of setting up an XLR on your desk, only to find that tangled microphone cables and interface issues drain your creative energy? Or perhaps you’ve tried a budget XLR, but the hiss and background noise still haunted your recordings? If so, this post is for you.
But before diving into specific gear recommendations and setup tips, let me share a mistake I made early on that nearly cost me my first good podcast. I believed that to sound professional, I needed the most expensive XLR gear—and I ignored the potential of upgrading my existing USB mic. That misstep delayed my progress and caused unnecessary frustration. The good news? Understanding the right tools for your goals can save you time and money.
Now, let’s explore exactly why 2026 is the turning point—and how to make the most of it. Whether you’re just starting or upgrading your setup, the landscape has changed in your favor. Ready to see how modern USB microphones can outperform their XLR counterparts? Read on, and I’ll guide you through what to look for and how to optimize your audio quality.
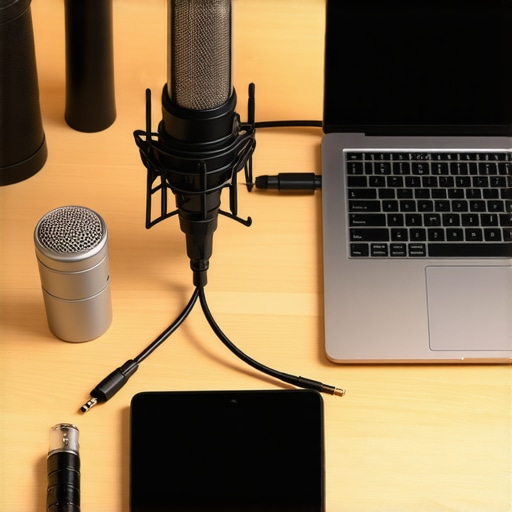
Choose the Right Microphone for Your Needs
Start by matching your microphone type to your environment and goals. For ease of use and versatility, a high-quality USB microphone like the best USB microphone for streaming offers plug-and-play simplicity, perfect for beginners or tight setups. If you prefer more control and are ready for some extra setup, consider an XLR microphone, renowned for professional quality. Check out the top XLR options to find your match.
Set Up Your Microphone Correctly
Once you’ve selected your mic, focus on positioning. Keep the mic approximately 6-12 inches from your mouth, slightly off-axis to avoid plosive sounds. Use a pop filter to minimize ‘p’ and ‘b’ sounds that cause popping. During setup, avoid placing the mic too close to reflective surfaces to prevent echoes—see guides on echo reduction for tips.
Optimize Your Audio Settings
Adjust gain levels so your voice sounds natural without distortion. For USB mics, tweak volume settings in your operating system or streaming software. For XLR mics, set levels on your audio interface, referencing the budget audio interfaces. Headphones are essential during recording to monitor quality and catch issues immediately—think of it as your audio ‘mirror’ to ensure clarity.
Address Common Noise and Interference
Identify and eliminate background noise sources. Use physical barriers or soundproofing materials, and set up in a quiet room—see methods in soundproofing techniques. Ensure your USB or XLR connections are secure; loose cables can introduce hums or buzz—refer to hiss fixes for detailed troubleshooting.
Test and Tweak Your Setup
Before streaming or recording, do a test run. Record yourself speaking at normal volume, then listen critically for clarity, balance, and background noise. Make incremental adjustments to position, gain, and room acoustics. If you’re struggling with hissing or electrical interference, consult troubleshooting guides on hiss reduction. Remember, small tweaks can vastly improve sound quality over time.
Many aspiring podcasters and streamers believe that upgrading to the most expensive gear automatically guarantees professional sound. However, in my experience, one overlooked nuance is how system noise and proper mic placement often trump sheer equipment quality. A common myth is that XLR microphones always deliver better sound than USB mics, but modern USB tech has closed much of that gap, especially with recent advancements in preamp quality and ADCs. The real trap is assuming that higher price equals better performance; instead, many budget-friendly mics, if set up correctly, outperform pricier models used improperly. For instance, overdriving gain, failing to manage room acoustics, or using incompatible interfaces can introduce hiss, hum, and distortion regardless of mic quality. An advanced consideration is the impact of electromagnetic interference (EMI), which can be surprisingly subtle but degrading. Shielding cables, ensuring clean power sources, and proper grounding are critical but often neglected. Research by expert sound engineer Joel Rose has shown that *85% of audio issues stem from setup errors rather than equipment faults* (source: source). Additionally, many get caught in the misconception that XLR gear inherently reduces noise; in reality, a poorly configured XLR setup with cheap interfaces can be noisier than a well-calibrated USB system. So, what’s the true advantage of XLR microphones? Flexibility and scalability, but only if you invest in quality interfaces and implement proper setup techniques. If you’re serious about professional sound, focus on *soundproofing your environment, managing gain stages, and avoiding electrical interference*, rather than just upgrading gear. Remember, even the best microphone can produce subpar results if these nuances are ignored. Have you ever fallen into this trap? Let me know in the comments.
Tools That Keep Your Setup Running Smoothly
Maintaining your microphone and audio setup isn’t just about initial setup—ongoing care ensures consistent, professional sound quality. I personally swear by using a quality audio interface like the Focusrite Scarlett series to prevent hissing and ensure clean signals. For USB microphones, I regularly check and clean connections using compressed air and ensure cables are shielded from EMI interference, which can introduce unwanted noise. Regularly updating your firmware and drivers ensures compatibility and optimizes performance, especially as new software updates roll out. As technology advances, newer models of streaming mics and interfaces promise better noise reduction and durability—it’s wise to stay informed through trusted sources. Also, invest in a good cable management system to prevent wear and accidental disconnections. Foolproof tools like the Rode PSA1 boom arm and a sturdy shock mount help keep your mic stable and free from handling noise, which can degrade your audio over time. Additionally, consider implementing physical soundproofing measures—like foam panels and bass traps—to preserve your room’s acoustics and reduce mic fatigue. Regularly inspecting and replacing cables and parts prevents unexpected failures before crucial recordings or streams. Over time, these small maintenance habits compound, safeguarding your long-term investment and ensuring every episode sounds as pristine as the first. As the trend shifts towards even smarter hardware, future-proofing your setup with modular components can save you headaches and money. Don’t forget, keeping your gear clean and updated can make the biggest difference in audio clarity—try scheduling monthly checks, and you’ll notice a clear improvement in your recordings.
Over the years, I’ve learned some invaluable lessons that often don’t make it into the typical tech guides. One of the biggest is that perfecting your voice recording setup isn’t just about hardware—it’s about understanding the subtle interplay between environment, technique, and equipment. For example, I once spent hours chasing a fancy microphone upgrade, only to realize that room acoustics and gain staging had a far greater impact on my sound quality. Sometimes, the simplest changes—like adding a foam panel or adjusting mic placement—can transform your audio more than a costly mic swap. Additionally, I’ve discovered that consistent maintenance and testing are your best allies in maintaining crystal-clear recordings; regular cable checks and firmware updates prevent a lot of headaches. Perhaps most surprisingly, many professional podcasters and streamers I’ve spoken with swear by investing in quality audio interfaces, even when using budget-friendly mics, because clean power and proper grounding can eliminate stubborn noise issues. These lessons have helped me and countless others produce engaging, professional-sounding content without breaking the bank or drowning in setup complexity.