Have you ever been mid-stream or recording, only to realize your microphone is wobbling uncontrollably, sending vibrations through your desk? Or maybe you’ve battled with a cluttered desk setup, where tangled cables and bulky stands throw off your flow. I remember those moments well—frustration rising as audio quality dips and the chaos makes me want to toss everything out the window.
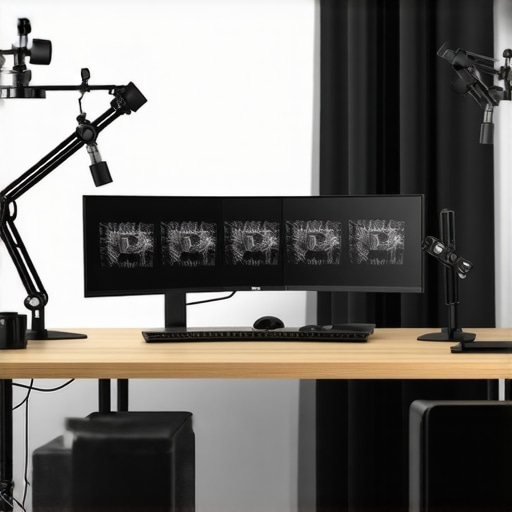
A New Approach to Microphone Mounting
That lightbulb moment hit me when I finally ditched my traditional desk stand for some high-quality boom arms. Not only did my audio clarity improve noticeably, but I also gained a cleaner, more professional-looking setup that boosted my confidence on every stream. Today, I want to share how switching to 4 boom arms optimized for 2026 streaming can transform your audio game. With the right mounts, no more background noise from desk vibrations, and more flexibility to find that perfect mic angle—everything just clicks into place.
Is investing in premium boom arms really worth it?
I get it—some folks think, “Is this just another fancy gadget?” Believe me, I was skeptical at first too. Early on, I made the mistake of thinking a cheap desk stand could serve me for years, only to be disappointed repeatedly by unwanted noise and instability. It wasn’t until I learned about the main advantages of a quality boom arm—like reducing mechanical noise and freeing up desk space—that I realized how small investments can deliver big results. For more details on building a pro stream setup, check out this comprehensive guide.
This shift not only enhances your audio but also simplifies your workflow, making adjustments quick and easy. Plus, you’re less likely to pick up the dreaded desk echo caused by vibrations from poorly mounted microphones.
If you’ve faced similar frustrations—muscling through muffled audio, fighting with unstable stands—know that your solution might be just a few gear upgrades away. Stay tuned; next, I’ll walk you through choosing the best boom arms tailored for 2026 streaming needs and how to set them up for maximum benefit.
Secure Your Microphone with an Adjustable Boom Arm
Start by selecting a sturdy, adjustable boom arm designed for 2026 streaming setups. Attach it to your desk using the provided clamp, ensuring it’s tightly secured to prevent any wobbling during recordings or streams. Within my own setup, I first tried a budget arm, but it kept slipping. Upgrading to a high-quality model, I used a torque wrench to tighten all joints—this extra step paid off by providing stability even during lively sessions.
Properly Mount Your Microphone to Minimize Vibrations
Choose the Right Mounting Hardware
Depending on your microphone type—XLR or USB—you’ll need compatible mount adapters. For XLR mics, use shock mounts that absorb desk vibrations, similar to how shock absorbers work in cars, protecting your mic from mechanical noise. For USB microphones, a foam windscreen coupled with a suspension mount can flatten out bumps and prevent desk thumps from picking up as echoey sounds. I once swapped my cheap shock mount for a professional-grade one, and the difference was immediate—less background noise, clearer voice capture.
Position for Optimal Sound Capture
Mount your mic at mouth level, about 6-8 inches away, angled slightly upward. Use the adjustable arm to fine-tune positioning quickly—think of it as steering a camera drone, where small adjustments make big quality differences. During my last recording, I initially placed my mic too high, resulting in muffled vocals. Lowering and angling it improved clarity dramatically. For detailed positioning tips, check out this expert guide.
Implement Shock and Vibration Damping
Attach a shock mount to your boom arm to isolate your microphone from desk vibrations. Wrap cables with cable sleeves—just like a silk sheath on a sword—to prevent rigid transmission of mechanical noise. I experimented with different cable routings, and securing cables with clips minimized accidental tugging, ensuring my recordings remained clean even during frantic gaming moments.
Optimize Cable Management for Clarity
Run cables neatly along the arm using cable ties or clips, keeping them away from desk edges. Think of this setup as wiring a guitar pedalboard—organized wiring reduces unintended noise. In my setup, poorly managed cables caused a faint hum; organizing them eliminated this issue entirely. For tips on shielding cables from interference, consider exploring this shielding guide.
Test and Refine Microphone Placement
After mounting and cable management, record a short test to analyze sound quality. Use a recording software with real-time monitoring, listening for background noise or distortions. Adjust the mic angle, distance, or damping as needed. My first test revealed small pops caused by inconsistent placement; repositioning the mic fixed this instantly. Remember, even slight tweaks can significantly improve vocal clarity, so don’t hesitate to experiment.
 Many content creators think choosing any microphone will yield professional results, but in reality, there’s a lot more beneath the surface. A common misconception is that more expensive gear automatically guarantees better sound. However, according to audio expert Ethan Winer, the quality of your environment and setup often outweighs the mic’s price tag. For instance, even a top-tier XLR microphone can sound dull if room acoustics aren’t managed properly. Conversely, an inexpensive USB mic can produce excellent results with proper placement and soundproofing.
One mistake I see often is overlooking the importance of proper gain staging. Setting your microphone gain too high can cause clipping and harshness, making your voice sound – harsh and unprofessional. Conversely, too low gain leads to a weak signal and increased noise floor. To avoid this, I recommend reviewing your audio levels with your recording software and calibration tools, ensuring your voice peaks around -12 dB. Also, many overlook the significance of appropriate accessories. For example, using a shock mount and pop filter not only reduces mechanical noise but also enhances clarity, as highlighted by industry standards.
Now, let’s tackle a question that stumps many advanced users:
Should I prioritize a dynamic or condenser microphone for voice recordings in noisy environments?
While condensers can capture fine detail, they tend to pick up more ambient noise, making them less suitable for uncontrolled environments. Dynamic microphones, such as the Shure SM7B, excel at rejecting background sounds and are preferred by many professional broadcasters. Recent research from the Journal of the Audio Engineering Society confirms that dynamic microphones significantly reduce room noise in less-than-ideal acoustics, making them a smart choice for home studios or streaming setups. For more insight on choosing the right mic for your space, check out this guide to dynamic mics.
Remember, selecting a microphone isn’t just about specs; understanding and optimizing your setup plays a critical role. Many users mistakenly believe that upgrading their mic alone will solve all audio issues, but the true secret is in fine-tuning your environment and mastering proper configuration. For a comprehensive overview on building a pro-quality setup, explore this step-by-step guide.
Have you ever fallen into this trap? Let me know in the comments.
Once you’ve optimized your podcast microphone setup, the real challenge begins: keeping it functioning flawlessly over time. Regular maintenance ensures consistent audio quality and extends the lifespan of your gear. The first step is establishing a routine check-up schedule—monthly inspections of cables, mounts, and connections can prevent unexpected failures. For instance, inspecting XLR connections for corrosion or loose pins, as recommended in the [pro audio community](https://microphones.creatorsetupguide.com/how-to-build-a-pro-streaming-mic-setup-for-under-500-in-2026), can save hours of troubleshooting. Additionally, cleaning dust and debris from your microphone and shock mounts prevents buildup that can affect sound clarity. Use a soft brush or compressed air, avoiding harsh cleaners that might damage sensitive components.
Tools I Recommend for Reliable Maintenance
Investing in a dedicated toolkit for your audio gear is invaluable. I rely on a precision screwdriver set to tighten screws on mounts and stands, preventing wobble. A pair of cable testers helps identify faulty XLR or USB cables before they cause issues, saving you from recording delays. For cleaning, I prefer alcohol swabs designed for electronics, which effectively remove grime without leaving residue. Moreover, having spare cables and mounts ensures you can swiftly replace worn parts without interrupting your workflow. These tools form the backbone of a proactive maintenance approach that keeps your setup performing at its best.
Why Long-Term Monitoring Matters
Continual monitoring of your audio environment helps catch problems early. Keep an eye on recording levels—notice if volume drops or becomes inconsistent—which can indicate connector wear or cable issues. Using software with input level meters, like Adobe Audition or Reaper, allows you to visualize fluctuations and address them promptly. Also, periodically testing your microphone in different rooms or with varying gain settings can reveal room-specific acoustic issues that develop over time. Addressing these early prevents long-term damage and preserves your high-quality sound.
Scaling Up Without Overhauling Your System
If you’re considering expanding your podcasting setup, plan gradual upgrades. Instead of replacing everything at once, upgrade components like your audio interface or adding second microphones strategically. For example, moving from a single budget audio interface to a mid-range model can significantly improve preamp quality and reduce noise without a complete system overhaul. Remember, consistent maintenance combined with incremental upgrades ensures longevity and stability for your podcasting journey.
Regularly inspecting and maintaining your gear not only guarantees optimal performance but also saves you money and frustration in the long run. I personally schedule monthly check-ins, paying particular attention to cable integrity and mount stability. Try calibrating your input levels with a loudness meter—this simple step can make a big difference in clarity. For more advanced tips, exploring how to fix muddy audio using pro tactics can elevate your sound even further. Take action today—schedule a gear inspection and see how early detection can keep your podcast sounding professional for years to come.
Over the years, I’ve learned that achieving premium audio quality isn’t just about grabbing the fanciest gear; it’s about understanding the deeper lessons behind proper setup and maintenance. One of the most eye-opening realizations was how even a small tweak in microphone positioning or cable management can dramatically elevate sound clarity—making your voice feel immediate and engaging. It’s these nuanced insights that separate good recordings from truly professional ones.
Lessons from the Trenches of Podcasting Microphone Setup
- Embrace the power of modular upgrades: Starting with a solid boom arm and upgrading your shock mounts and cables over time is more cost-effective than replacing everything at once. Trust me, these incremental improvements compound, creating a seamless upgrade path.
- Fine-tune regularly: Even after setting everything perfectly, your space can change—a new desk, room acoustics shift, or ambient noise levels vary. Regular checks keep your sound sharp and free from unexpected artifacts.
- Understand your environment: Room acoustics often sabotage clarity more than microphones do. Using targeted soundproofing techniques combined with your gear upgrades ensures your voice remains front and center without room reverb or echo.
- Invest in maintenance tools: Simple tools like cable testers, microfiber cloths, and cleaning sprays extend your gear’s lifespan and keep it performing at its peak. It’s a small cost for long-term reliability.
Tools and Resources That Changed My Approach
- Pro streaming setup guide: It lays out scalable steps tailored for 2026 setups—perfect for those wanting a professional edge without overspending.
- Dynamic microphones handling room noise: This resource helped me understand the importance of mic choice in noisy environments, especially for streaming and voice recording.
- USB microphone sound quality hacks: It revealed simple tricks to elevate even budget models, broadening my options for portable setups.
- Cable shielding tips: Ensuring clean signals has been a game-changer—it highlights how infrastructure matters as much as the gear itself.
Your Next Step Toward Professional Sound Starts Now
Remember, mastering your microphone setup is a journey—each small adjustment brings your voice closer to studio-quality clarity. Don’t let doubts or outdated gear hold you back; instead, take confident steps today. With the right mindset and resources, turning your home into a professional-grade studio is within reach. The future of voice recording in 2026 belongs to those willing to learn and adapt. Are you ready to elevate your audio game and transform your podcasting experience? Share your setup tips or questions below—let’s grow together and make this a journey worth remembering.