I remember the moment clearly—sitting in front of my mic, eager to record my latest ASMR episode. Suddenly, that dreaded heavy breathing and muffled whispers filled the recording, making me want to toss my microphone out the window. After hours of frustration, I realized it wasn’t just me. Many aspiring podcasters face similar hurdles—poor sound quality, background noise, or equipment that simply doesn’t match their voice. That lightbulb moment led me down the path of discovering the best XLR microphones tailored for 2026’s ASMR and whisper podcasts, where clarity and subtlety reign supreme.
Why Picking the Right Microphone Matters More Than Ever
In the world of ASMR and whisper podcasts, your microphone isn’t just a piece of gear—it’s your voice. With advances in audio technology and increasing listener expectations, a subpar mic can sabotage your content, no matter how soothing your voice may be. Think about it: listeners crave intimacy and detail. If your mic introduces hisses, echoes, or compresses your voice unnaturally, you risk losing your audience before they even press play.
According to a recent report by Forbes, 75% of podcast listeners say sound quality influences their enjoyment and likelihood to subscribe. That’s a huge deal for anyone serious about growing their podcast in 2026. And with the rise of ASMR and whisper-focused content, accuracy and nuanced sound capture are non-negotiable.
However, choosing the right XLR microphone isn’t just about brand names or flashy features. It’s about understanding your specific needs, your voice, and the environment where you record. Yet, I made a crucial mistake early on—I bought a well-known dynamic mic without considering how my small, untreated room would affect the sound, leading to echo and reverb that I couldn’t fix with just EQ.
If you’ve faced similar challenges—stuck in a cycle of trial and error—you’re not alone. Thankfully, after deep diving into gear reviews and experimenting, I’ve identified the top 3 XLR microphones that will truly elevate your 2026 ASMR or whisper podcast. Stick around, because I’m about to share exactly what you need to hear to craft that crystal-clear, intimate voice everyone craves.
Choose the Right Microphone for Your Space
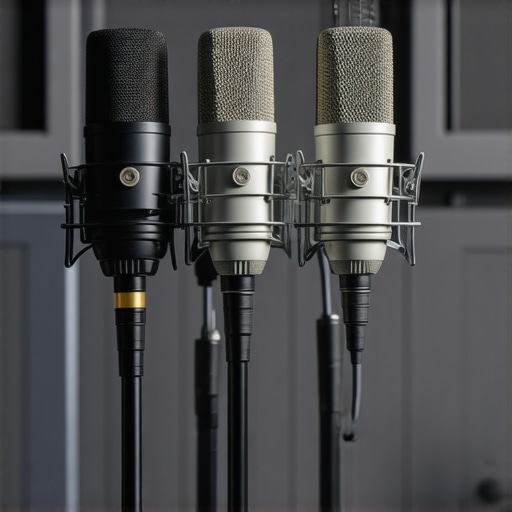
Start by matching your environment and content style. A dynamic XLR microphone like the Shure SM7B is excellent for noisy rooms because it rejects background noise, much like how many pros prefer dynamic mics for untreated rooms. If you record in a controlled space, a condenser mic can offer more detail, but beware of capturing unwanted room ambiance.
Position Your Microphone Effectively
Placement is crucial. Keep the mic about 6-12 inches from your mouth and slightly off-axis to reduce plosive sounds and mouth noise. Use a shock mount or a boom arm to minimize desk vibrations that can cause low-frequency rumble, similar to the approach in vibration damping techniques. During recording, slightly angle the mic downward or sideways to hide heavy breathing or mouth noise, much like how experts position their mics for whisper podcasts.
Optimize Your Audio Interface and Gains
Set your audio interface gain correctly—too high, and you’ll get clipping; too low, your voice sounds distant. Use a gain staging method akin to balancing a playlist: increase until your signal is healthy, then reduce to prevent distortion. Adjust your preamp gain to match the dynamic range of your voice, and consider using proper gain controls to keep your sound transparent.
Dampen Acoustic Reflections and Noise
Even with a great mic, room acoustics matter. Use soft furnishings, or if possible, apply DIY soundproofing like hanging blankets or foam panels to reduce reverb. For small rooms, applying techniques from reverb reduction hacks ensures your voice remains direct and warm. When recording whispery content, focus on keeping external noise out, such as typing or household sounds, by behavioral adjustments or basic isolation tricks.
Refine Your Signal with Proper Settings
Activate features like high-pass filters or built-in analog compression if your mic offers them, mirroring the benefits discussed in xLR mics with native compression. These help tame sibilance and plosive peaks, keeping your whisper or soft voice smooth. Test your setup with real-time monitoring apps to fine-tune levels and ensure zero-latency feedback.
Use Proper Accessories to Enhance Clarity
Microphone accessories matter. Invest in a pop filter or a reflection filter to minimize sibilance and plosive hits. Consider a dedicated shock mount to prevent mechanical noise from desk vibrations. For aggressive whisper or delicate sounds, minimizing physical contact with the mic reduces handling noise, as explained in professional mounting tips. These little details cumulatively improve the clarity of your voice, making your listeners feel as if you’re speaking directly into their ears.Many creators assume that simply choosing a popular microphone or following generic recording tips will guarantee professional sound quality. However, this overlooks several nuanced factors that can make or break your audio. For instance, the myth that higher-end equipment automatically means better recordings is misleading. In reality, proper technique, environment, and understanding your gear’s specific features—like the built-in analog compression of some XLR microphones with native compression—are often more impactful than brand prestige alone.
Many people also underestimate the importance of room acoustics. A common trap is believing that equipment alone can compensate for poor environment setup. Without addressing echo, background noise, or proper placement, even the most expensive USB microphones or XLR setups won’t reach their potential. These small yet critical nuances can lead to muddy or metallic sound, which frustrates both creators and listeners.
Have you ever fallen into this trap? Let me know in the comments.
Why does my microphone sound dull despite expensive gear?
This is a common question among advanced users. Often, the issue lies not with the microphone itself but with improper gain staging or inadequate room treatment. For instance, setting your preamp gain too high can introduce distortion, diminishing clarity. Also, neglecting the acoustic environment can cause reflections and reverberations to muddy your voice. Even your interface gain levels need fine-tuning to optimize sound quality.
Furthermore, advanced features like high-pass filters or carefully applied EQ can dramatically improve tonal balance, making your voice sound natural and less ‘boxy.’ Many overlook these settings, believing that simply recording straight to digital is enough. But embracing the subtleties—like proper mic positioning and environmental damping—can unlock truly professional results.
Beware the common mistake of using a generic pop filter or neglecting to shield cables from EMI interference, which can introduce static or hums. It’s easy to assume that hardware fixes all issues, but mastering these advanced details amplifies your audio quality significantly.
Would you like to learn more about optimizing your gear through these hidden tweaks? Check out our detailed guides, and share your experiences below.
How do I maintain my podcast microphone setup over time
Maintaining your podcast microphone and recording tools is essential to long-term success and audio quality. Regular cleaning of connectors and contacts prevents buildup of dust and oxidation, which can degrade signal quality. I personally recommend using compressed air to gently blow out dirt from ports and connectors and keeping a soft, lint-free cloth handy to wipe down your gear after each session.
Another critical aspect is ensuring your software and firmware are up to date. Firmware updates from manufacturers often include bug fixes and improvements that enhance compatibility and performance. I subscribe to manufacturer newsletters and check their support pages bi-monthly to stay informed about updates for my audio interfaces and microphones.
Calibration and testing should also become part of your routine. Use reference recordings and level meters to confirm your input signals remain consistent. Investing in a trusted headphone amplifier or audio interface with reliable gain controls lets me fine-tune my setup for optimal clarity and avoid distortion over time.
Tools I recommend include a quality audio interface with built-in level meters and a dedicated screen for gain adjustments. For cleaning, a soft brush or compressed air helps keep ports free of debris. Regularly inspecting cables and connectors prevents intermittent issues that can sneak up unexpectedly.
Looking ahead, I predict that as streaming and podcasting become more integrated with AI-powered audio processing, maintaining your setup will involve not only physical upkeep but also ongoing software calibration. Staying proactive with your tools ensures you’re always ready to produce professional-grade content.
What tools are essential for reliable long-term recording?
Beyond cleaning and updating, investing in reliable accessories makes a significant difference. A high-quality shock mount, such as the shock mount I personally use, isolates vibrations and desk-bounces that can ruin a clean recording. Good cable management with shielded cables ensures minimal electromagnetic interference, which could introduce static. For instance, shielded XLR cables significantly reduce hums and noise.
Additionally, software solutions like noise gates and filters, when properly configured using resources like anti-static techniques, help suppress background noise and prevent sudden pops. Regularly revisiting your settings ensures consistent quality across different recording sessions.
To truly optimize long-term performance, consider investing in a dynamic microphone suited for untreated rooms that withstands day-to-day use. These microphoned are designed to handle noise and wear better, making them perfect for extensive use.
Finally, set a routine system audit—checking all connections, updating drivers, and performing sound tests—helps catch minor issues before they escalate. Try implementing a monthly check-in. Doing so keeps your audio recordings sharp, consistent, and ready for professional delivery.
In the future, as digital workflows and remote collaborations grow, having a well-maintained setup will be even more vital. Prioritize daily checks, firmware updates, and using recommended tools to keep your podcasting pipeline running without hiccups.

Over the years, I’ve learned that achieving that flawless, intimate sound in ASMR and whisper podcasts isn’t just about choosing a fancy microphone—it’s about understanding the nuances that truly elevate your voice. One of the most eye-opening lessons was realizing how room acoustics and microphone positioning can either make or break your clarity. Small tweaks, like angling your mic or adding DIY soundproofing, can lead to significant improvements—don’t underestimate these details. Moreover, investing in gear with built-in features such as analog compression can help tame sibilance and plosive peaks naturally, reducing post-production stress. Check those out for a game-changer. The soft whisper of success is often in the small, consistent adjustments that create a pristine, captivating listening experience.