I remember the exact moment I realized my voice sounded terrible on my first streaming attempt. I was excited, mic in hand, ready to go live. But as soon as I started speaking, I heard this harsh, muffled sound that made me cringe. Turns out, I had bought a mic based on hype, not my actual needs. That mistake cost me hours of frustration and a lot of lost confidence. Sound quality isn’t just a small detail — it’s the foundation of engaging content, whether you’re streaming, podcasting, or recording vocals. And trust me, if your microphone doesn’t suit your voice or setup, no fancy editing can fix that.
Why Picking the Right Microphone Matters More Than Ever
In 2024, the quality of your audio can make or break your audience’s experience. With so many options out there, it’s easy to get overwhelmed. Do you go for a USB mic that’s simple and plug-and-play? Or do you invest in an XLR setup that offers professional sound but requires more equipment? I’ve tested dozens, and I’ll guide you through the most important factors to consider. Plus, I’ll share some common mistakes that could be sabotaging your sound right now. Did you know that according to a recent survey, over 60% of streamers and podcasters admit their audio quality is subpar and holding them back? That’s a huge missed opportunity.
Is All the Hype About Microphones Just Overrated?
Honestly, I made the rookie mistake of chasing after the most expensive gear early on. I thought a $300 microphone would instantly improve my streams. Spoiler: it didn’t. The real secret is matching the microphone to your voice and setup — and understanding what features actually make a difference. If you’re feeling skeptical, I get it. I was there. But after years of experimenting, I can confidently say that choosing the right microphone is about more than just price. Want to avoid my mistakes? Let’s dive into what really matters when picking your best microphone for 2024. For a detailed look at the different types, check out my guide on [top microphone types for streaming and voice recording](https://microphones.creatorsetupguide.com/top-microphone-types-for-streaming-voice-recording-in-2024-expert-guide). Now, let’s get started on finding your perfect match.
Test Your Voice and Microphone Setup
Before you dive into streaming or podcasting, record a quick test using your chosen microphone. Speak naturally and listen carefully. This initial recording reveals if the microphone captures your voice clearly or if there are issues like muffling, hiss, or distortion. For example, I once used my new USB mic without testing and was shocked to hear a constant background hum. Taking the time to test saved me from embarrassing live moments and allowed me to identify that my USB cable was faulty. Use this step to identify problems early and avoid wasting time on setups that won’t work for your voice.
Adjust Your Microphone Placement and Settings
Position Matters
Place the microphone about 6-12 inches from your mouth, slightly below or above to avoid plosives. Think of it like positioning a camera — the right angle and distance make all the difference. For instance, I initially set my mic too far away, which caused distant, weak audio. Moving it closer improved clarity instantly. Use a boom arm or a mic stand for stability and experiment with angles until your voice sounds full and natural. Remember, a good position minimizes background noise and pops.
Configure Your Audio Settings
In your computer or streaming software, set the input gain so your voice is loud enough without clipping. Clipping occurs when the input is too high, causing distortion. Use a level meter to watch your voice levels — aim for peaks around -6dB. On platforms like OBS or Streamlabs, you can add filters like noise suppression, compression, and equalization to refine your sound. I once overused noise suppression, making my voice sound hollow, but fine-tuning the filters brought back natural warmth. Test different settings and record short clips to compare results.
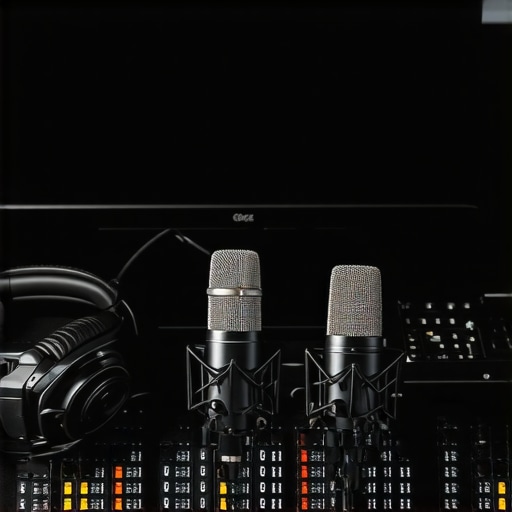
Choose the Right Microphone Type for Your Needs
Deciding between USB and XLR microphones depends on your setup and goals. USB mics are plug-and-play, perfect for beginners or those with limited space. XLR mics require an audio interface but offer superior quality and flexibility. For example, I started with a USB microphone, which worked well initially, but upgrading to an XLR with a dedicated interface significantly improved my sound for professional podcasts. Explore options like best USB and XLR microphones for 2024 to find your ideal match.
Test and Fine-Tune Your Setup Regularly
Once your microphone is set up, periodically test your audio. Changes in room acoustics, microphone position, or even your voice can affect quality. For instance, I noticed my voice sounded dull after rearranging my desk. A quick repositioning and adjusting gain fixed the issue. Make it a habit to record short samples, listen critically, and tweak settings as needed. This ongoing process ensures your sound stays professional and clear, no matter how your setup evolves.
Invest in Quality Accessories
Microphones are just one part of the puzzle. Use pop filters to reduce plosives, shock mounts to minimize handling noise, and quality cables to prevent interference. These accessories might seem minor, but they have a big impact. I once ignored a cheap XLR cable, which introduced hum and hiss. Upgrading to a shielded cable cleaned up my audio, saving me hours of troubleshooting. Prioritize these investments to get the most out of your microphone choice.
While many beginners focus on choosing the right microphone, they often overlook nuances that can significantly impact their audio quality. Let’s dig deeper into what most people get wrong about microphone setup and usage, and how you can avoid these pitfalls to achieve professional sound.
Why Bigger Isn’t Always Better for Microphones
A prevalent myth is that larger, more expensive microphones automatically deliver superior sound. Many believe that investing in a high-end condenser mic guarantees clarity and warmth. However, this isn’t always true. The key is matching the microphone’s characteristics to your voice and environment. For example, a large-diaphragm condenser might capture more detail but also pick up unwanted room noise or sibilance if not properly positioned or treated acoustically. In some cases, a smaller, controlled microphone like a dynamic or a well-chosen USB mic might outperform an expensive condenser in a noisy or untreated space. For insights on the best types for your setup, explore the top microphone types for streaming and voice recording.
The Hidden Trap of Over-Equalizing and Post-Processing
A common mistake is relying too heavily on EQ and editing to fix poor initial recordings. Many assume that software can magically clean up bad audio, but the truth is, if your microphone setup is flawed, no amount of post-processing can fully rescue your sound. Over-equalizing can introduce unnatural artifacts, making your voice sound hollow or distorted. Instead, focus on getting the best raw audio possible by proper placement, gain staging, and environmental control. Remember, the best post-processing is minimal — a clean, natural recording doesn’t need much tinkering. For more advanced tips, see my ultimate guide to top podcast and streaming microphones.
Are Dynamic Microphones Only for Loud Environments?
This is a misconception that can limit your options. Many believe dynamic mics are only suitable for stage performances or loud sources, but in reality, they excel in noisy environments because they reject background noise better than condensers. Additionally, dynamic mics tend to have a more limited frequency response, which can be advantageous for capturing a more natural and less sibilant voice. They’re also less sensitive, meaning you don’t have to worry as much about proximity effect or delicate placement. For a balanced choice, consider a top voice streaming microphone for clear recordings that fits your environment.
Finally, don’t fall into the trap of thinking that equipment alone guarantees high-quality audio. Your technique, environment, and setup are equally critical. Properly positioning your mic, controlling room acoustics, and understanding your gear’s limitations are what truly elevate your sound. Have you ever fallen into this trap? Let me know in the comments!
Keeping your microphone setup in top shape over time requires more than just initial calibration. Regular maintenance ensures sustained audio quality and minimizes unexpected issues that can disrupt your recordings or streams. I personally schedule a monthly checkup of my gear, which includes inspecting cables, cleaning connectors, and updating firmware or drivers. This proactive approach prevents deterioration caused by dust, corrosion, or firmware bugs. For example, I’ve found that dust buildup on XLR connectors can cause crackles, so I now routinely wipe down my connections with a soft, dry cloth and use contact cleaner when necessary.
How do I maintain my microphone setup over time?
One of my favorite tools for maintenance is the contact cleaner, which I apply sparingly to XLR and USB connections to prevent oxidation. I also keep a microfiber cloth handy to gently clean mic grills and windshields, which can collect dust or moisture. Additionally, I regularly update my audio interface drivers and firmware because manufacturers often release improvements or fixes that enhance stability and performance. For instance, streaming platforms like OBS or Streamlabs also release updates that optimize audio processing, so I make sure to keep my software current. This routine helps me avoid the dreaded drop in audio quality during live sessions and ensures my mic always performs at its best.
Recommended tools that keep my microphone performing well
My go-to hardware tools include a high-quality contact cleaner like DeoxIT, which prevents oxidation of connectors, and a set of replacement XLR cables with good shielding to prevent interference. I also rely on a pop filter and shock mount, which I clean regularly with a soft brush and alcohol wipes to prevent buildup of dirt and moisture. For software, I swear by the latest versions of ASIO drivers, which offer low latency and stable audio streaming, especially when combined with noise suppression filters. These filters, available in software like OBS, allow me to fine-tune my sound without over-processing. Regularly revisiting and recalibrating your setup ensures consistent voice clarity and prevents costly repairs or replacements down the line.
Looking ahead, I believe adaptive software with AI-driven diagnostics will become more prevalent, automatically alerting you to potential issues before they affect your recordings. To get started today, try running a monthly check using these tools and updating your software to the latest versions. This small investment in maintenance pays off by keeping your sound crisp and professional over the long haul. For detailed recommendations, check out my guide on top microphone types for streaming and voice recording.
After countless hours of trial and error, I’ve discovered that the real game-changer isn’t just buying an expensive microphone — it’s understanding the nuances of setup, environment, and technique. In this guide, I’ll reveal the insider lessons I learned that can elevate your audio quality from mediocre to professional without breaking the bank.
The Hardest Lesson I Learned About Microphones
One of my most valuable lessons was realizing that microphone choice is only part of the equation. Proper placement, gain staging, and room acoustics often matter more. I once spent a fortune on a top-tier condenser mic, only to realize my untreated room made my sound harsh and muffled. The breakthrough came when I learned to position my mic correctly and invest in simple acoustic treatments. This taught me that the fundamentals of setup are what truly unlock great sound.
3 Myths About Microphones That Held Me Back
Myth 1: Bigger microphones are always better. The truth is, a small dynamic mic can outperform a large condenser in noisy environments. Myth 2: High-end gear guarantees professional sound. Often, matching the mic to your voice and environment is more important. Myth 3: Post-processing can fix bad recordings. No amount of EQ can substitute for proper setup from the start. Recognizing these myths saved me a lot of money and frustration.
What Experts Won’t Tell You About Microphone Placement
One overlooked tip is the importance of consistent positioning. Small adjustments — like angling the mic slightly or changing distance — can dramatically improve clarity and reduce unwanted noise. I found that recording at a consistent distance and angle helped me develop a natural, balanced tone. Using tools like a boom arm or a stand ensures stability and repeatability, making your sound more professional over time.
Curated Resources for Elevating Your Audio Game
For me, the foundation always begins with the right knowledge. I trust this guide on top microphone types for 2024 to understand which gear suits my needs. I also rely on this ultimate guide to podcast microphones for practical tips. These resources helped me avoid common pitfalls and choose gear that fits my setup and goals.
Your Turn to Make a Difference in Your Sound
Remember, the journey to professional-quality audio isn’t just about gear — it’s about understanding your equipment, environment, and technique. Don’t wait until your setup feels perfect; start experimenting today. The right microphone setup can transform your voice into a compelling, clear, and engaging sound that truly connects with your audience.
What’s one setup tweak you’re excited to try next? Share your thoughts below and let’s elevate our audio game together!
,
Reading about the importance of proper mic placement really resonated with me. I used to just set my microphone in front of me and forget about the angle or distance, which often resulted in muffled or distant audio. Once I started experimenting with positioning—like placing the mic slightly below my mouth and adjusting the angle—my sound instantly improved. It’s amazing how a small tweak can make such a difference. Also, I found that using a shock mount not only minimizes handling noise but also helps keep the microphone steady for consistent quality. Have others found that certain placements work better depending on their voice type or room acoustics? I’d love to hear different tips or setups that have worked for different environments or voice pitches.
This post really hits the mark about the importance of setup and environment in achieving professional audio quality. I used to think that buying a good mic was enough; however, I soon realized that placement, room acoustics, and proper gain staging make all the difference. I’ve found that even simple improvements like using a small foam panel behind the mic or angling it slightly can reduce unwanted reflections and background noise. When I first started experimenting with mic angles, I noticed a significant drop in sibilance and harshness. Have others experimented with different room treatments or mic angles to get that warm, natural sound? I’d love to hear your tips, especially on how to optimize small or untreated spaces for voice clarity. It’s always a balance between gear and technique, and this article offers a great reminder that no amount of equipment can replace good setup habits.
This article really nails the importance of not only choosing the right microphone but also mastering placement and environmental setup. I used to think that investing in a decent mic was sufficient, but I quickly learned that no gear can compensate for poor positioning or a noisy room. One tip that worked wonders for me was adjusting the mic angle to slightly below my mouth, which helped reduce sibilance without needing additional EQ. Also, I found that adding acoustic foam panels and even simple diffusers improved clarity significantly. Have others tried different room treatments for small spaces — and what’s been your most effective upgrade? It’s encouraging to see how small adjustments can lead to professional-sounding results without breaking the bank. I’d love to hear other people’s experiences with optimizing their space for voice recording or streaming.